

🌐 How to Create a Load Balancer on GCP
💡 What Is a Load Balancer in GCP?
A load balancer in Google Cloud Platform (GCP) is a service that distributes incoming network traffic across multiple backend resources, such as:
- Virtual machines (VMs)
- Container instances
- Managed instance groups
Load balancers help improve the availability, scalability, and fault tolerance of applications by evenly distributing traffic. They prevent any single resource from being overloaded, ensuring better performance and reliability.
👉 Learn more about Google Cloud Load Balancing.
Key Functions of Load Balancing
- Traffic Distribution: Distributes client requests among servers or resources to avoid overloading any single server.
- High Availability: Ensures that applications remain accessible even if one or more servers fail.
- Scalability: Supports scaling resources up or down to accommodate fluctuating traffic.
- Improved Performance: Reduces latency and enhances response times by directing traffic to the nearest or least-busy server.
- Fault Tolerance: Automatically redirects traffic from failed servers to healthy ones.
- Security: Protects applications by mitigating DDoS (Distributed Denial-of-Service) attacks and other vulnerabilities.
Features of GCP Load Balancing
- Global Load Balancing
- Serve users from the nearest available backend with minimal latency.
- Supports automatic failover to ensure high availability.
- Auto Scaling
- Automatically adds or removes backend resources based on real-time traffic demand.
- Health Checks
- Continuously monitors the health of backend instances and redirects traffic away from unhealthy ones.
- Traffic Routing
- URL-based routing: Direct specific paths or subdomains to different backend services.
- Session affinity: Ensures a client remains connected to the same backend for the duration of a session.
- Weighted backend distribution: Distribute traffic based on weights assigned to backends.
- Integration with Other GCP Services
- Works seamlessly with Compute Engine, Kubernetes Engine, and Cloud Storage.
- Supports Cloud Armor for security, and Stackdriver Logging and Monitoring for analytics.
- Hybrid and Multi-cloud Support
- Can be used with on-premises resources or in multi-cloud architectures.
How Load Balancing Works
When a client sends a request to an application, a load balancer acts as an intermediary and directs the request to the most appropriate backend server based on predefined rules. These rules can consider:
- Server health (via health checks)
- Traffic volume
- Geographic location
- Session persistence
Once the request is processed, the load balancer forwards the response back to the client.
🚀 Types of GCP Load Balancers
Google Cloud Platform offers different types of load balancers, each tailored to specific use cases:
- ⚙️ HTTP(S) Load Balancer:
-
- Works at Layer 7 of the OSI model (Application layer).
- Distributes HTTP and HTTPS traffic.
- Supports features like SSL termination, URL-based routing, and caching.
- 📶 Network Load Balancer:
-
- Operates at Layer 4 (Transport layer).
- Distributes non-HTTP/S traffic such as database queries or file transfers.
- Faster but less feature-rich than HTTP(S) load balancers.
- Handles User Datagram Protocol (UDP) traffic.
- Ideal for real-time applications like VoIP, video conferencing, and gaming.
- 🏠 Internal Load Balancer:
- Distributes traffic within a private network or Virtual Private Cloud (VPC).
- Used for internal applications like APIs, databases, or microservices.
- 🌍 Global Load Balancer:
- Distributes traffic across multiple geographic regions.
- Ensures low latency by directing traffic to the closest available server.
Below, we’ll walk you through the step-by-step process for creating each type of load balancer.
🌐 How to Create a Load Balancer on GCP: HTTP(S) Load Balancer
The HTTP(S) Load Balancer is used for web applications and supports advanced features like SSL termination and URL-based routing.
Steps to Create an HTTP(S) Load Balancer:
1. Access the GCP Console
- Log in to your Google Cloud Console with your credentials.
- Select the project where you want to create the load balancer.
- If you don’t already have a project, create one by clicking on Create Project in the top menu.
2. Navigate to the Load Balancing Section
- In the left-hand navigation menu, scroll down to the Network Services section.
- Click on Load Balancing to access the load balancing dashboard.
3. Click “Create Load Balancer”
- Once on the Load Balancing page:
- Click the “Create Load Balancer” button.
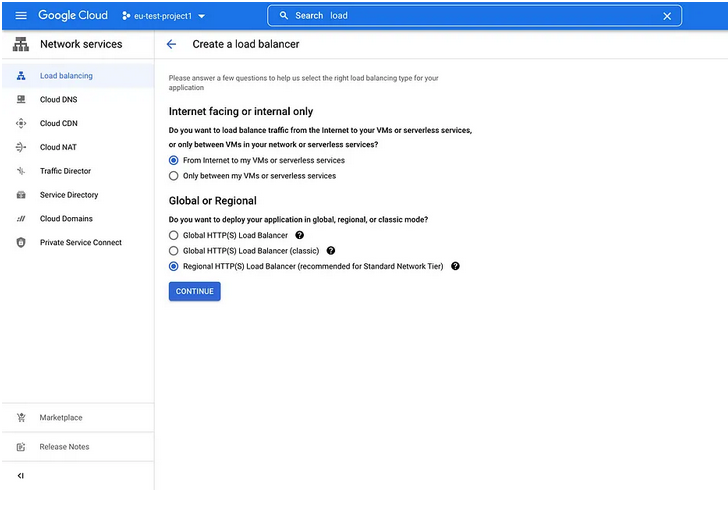
- Choose the “HTTP(S) Load Balancer” option. This load balancer is specifically for HTTP and HTTPS traffic.
- Select Global Load Balancer (for traffic across multiple regions) or Regional Load Balancer (for a specific region), depending on your requirements.
4. Configure the Frontend
The frontend defines how users interact with the load balancer.
- Frontend Name:
- Give a name to the frontend configuration (e.g.,
my-frontend).
- Give a name to the frontend configuration (e.g.,
- Set the Protocol:
- Choose HTTP or HTTPS depending on your traffic requirements.
- If using HTTPS:
- You will need to set up an SSL certificate. Use Google-managed certificates or import your own.
- Assign a Static IP Address (Optional):
- Assign a static IP address to ensure the frontend IP remains consistent.
- Click Reserve a Static IP and name it appropriately (e.g.,
frontend-ip).
- Set the Port:
- For HTTP, the default port is 80.
- For HTTPS, the default port is 443.
- Associate with a Backend:
- Link this frontend configuration to the backend service you created in Step 4.

5. Configure the Backend Service
The backend service determines where the load balancer sends traffic. Follow these steps to configure it:
- Name the Backend Service:
- Provide a descriptive name for the backend service (e.g.,
my-backend-service).
- Provide a descriptive name for the backend service (e.g.,
- Add Backend Instances:
- Click Create or Select Instance Group.
- Choose an instance group (e.g., a managed instance group) that contains the Compute Engine VMs or containers hosting your application.
- If you don’t have an instance group:
- Navigate to Instance Groups in the Compute Engine section.
- Create a new managed instance group by defining a template that specifies your application settings.
- Set Up a Health Check:
- Health checks are used to monitor the availability of backend instances.
- Click Create Health Check and define:
- Protocol: HTTP, HTTPS, TCP, or SSL (choose HTTP or HTTPS for this guide).
- Port: The port number where your application is running (e.g., 80 for HTTP or 443 for HTTPS).
- Path: Define the endpoint (e.g.,
/health) that the load balancer will use to verify the health of the backend instances.
- Save the health check configuration and attach it to your backend service.
- Set Traffic Distribution:
- Configure the capacity scaling for each backend instance (optional). For example:
- Distribute 80% of traffic to one backend and 20% to another.
- Set session affinity if your application requires users to remain connected to the same backend instance during a session.
- Configure the capacity scaling for each backend instance (optional). For example:

6. Configure URL Routing (Optional)
- If your application has multiple services or subdomains, you can set up URL-based routing:
- For example:
- Route requests to
/apito one backend service. - Route requests to
/webto another backend service.
- Route requests to
- For example:
- Use the Host Rules and Path Matchers feature in the load balancer configuration.
7. Review and Deploy
- Review the summary of your configuration in the Load Balancer Details page:
- Verify the frontend, backend, and health check settings.
- Click Create to deploy the load balancer.
- The configuration process may take a few minutes to complete.

8. Test Your Load Balancer
- Once the load balancer is active:
- Obtain the frontend IP address from the load balancer configuration.
- Open your browser or use a tool like
curlto send a request to the IP address. - Example:
- If your load balancer is configured for HTTP, visit
http://<frontend-ip>. - If it is configured for HTTPS, visit
https://<frontend-ip>.
- If your load balancer is configured for HTTP, visit
- Verify:
- The traffic is successfully routed to the backend instances.
- The response is as expected (e.g., the website or API loads correctly).
👉 Detailed instructions can be found in the HTTP(S) Load Balancing Guide.
📶 How to Create a Network Load Balancer
The Network Load Balancer is ideal for low-latency TCP/UDP traffic. It provides a regional, pass-through load balancing solution.
Steps to Create a Network Load Balancer:
- Go to the GCP Console.
- Select your project and navigate to Load Balancing.
- Click Create Load Balancer and select “Network Load Balancer.”
- Configure the backend:
- Add an instance group or VM instance.
- Set up a TCP/UDP health check.
- Set up the frontend:
- Assign an external or internal IP address.
- Choose the protocol (TCP or UDP).
- Save and deploy the load balancer.
👉 Learn more in the Network Load Balancing Documentation.
🏠 How to Create an Internal Load Balancer
The Internal Load Balancer is used for private traffic within a Virtual Private Cloud (VPC).
Steps to Create an Internal Load Balancer:
- Go to the GCP Console.
- Select your project and navigate to Load Balancing.
- Click Create Load Balancer and select “Internal Load Balancer.”
- Configure the backend service:
- Add a regional instance group or managed instance group.
- Set a health check.
- Set up the frontend:
- Assign an internal IP address.
- Specify the protocol (TCP).
- Save and test the load balancer within your private network.
👉 For more details, visit the Internal Load Balancer Guide.
🌍 How to Create a Global Load Balancer
The Global Load Balancer is used for distributing traffic across multiple regions, ensuring high availability for global users.
Steps to Create a Global Load Balancer:
- Go to the GCP Console.
- Select your project and navigate to Load Balancing.
- Click Create Load Balancer and select “HTTP(S) Load Balancer.”
- Set up backend services in multiple regions.
- Configure the frontend to use a global IP address.
- Set routing policies based on location or latency.
- Save and test your global load balancer.
👉 Learn more in the Global Load Balancer Documentation.
Benefits of Load Balancing
- Increased Reliability: By distributing traffic and providing failover mechanisms, load balancing minimizes downtime.
- Improved Performance: Enhances application response times by distributing traffic to the nearest or least-busy servers.
- Scalability: Handles increased traffic by dynamically adding or removing servers.
- Security: Protects against traffic spikes, DDoS attacks, and single points of failure.
- Simplified Maintenance: Enables maintenance or updates on individual servers without affecting application availability.
Best Practices for GCP Load Balancers
- Plan for High Availability
- Use multiple backend instances across zones or regions to handle failures.
- Leverage auto-scaling to handle traffic spikes dynamically.
- Optimize Routing
- Use URL-based routing to direct specific requests to appropriate backends.
- Enable session affinity for stateful applications.
- Monitor and Analyze
- Use Cloud Monitoring and Cloud Logging to track performance.
- Set up alerts for unhealthy backends or latency issues.
- Secure Traffic
- Use HTTPS for frontend connections.
- Protect backends with Cloud Armor rules and Identity-Aware Proxy.
- Cost Management
- Choose the appropriate load balancer type for your use case to avoid unnecessary expenses.
- Utilize lifecycle policies to optimize resource allocation.
Conclusion
Creating an HTTP(S) Load Balancer in Google Cloud Platform is a powerful way to ensure your application is highly available, scalable, and secure. By following the step-by-step process outlined above, you can efficiently distribute incoming traffic, handle spikes in demand, and provide a seamless experience for users worldwide. Whether you’re setting up a simple web application or managing a complex multi-region architecture, GCP’s HTTP(S) Load Balancer offers the flexibility and performance needed for modern workloads.
With features like SSL termination, URL-based routing, and integration with other GCP services, this load balancer is an essential tool for optimizing your infrastructure. Additionally, by implementing health checks, session affinity, and static IP configurations, you can enhance both reliability and user satisfaction.
Start leveraging the full potential of GCP’s load balancing today to improve application performance, reduce downtime, and scale effortlessly as your business grows. For further details, explore the official GCP Load Balancing documentation and unlock the best practices for your specific needs.
Learn more about: gcp external load balancer to internal load balancer