
Install and Run a Kubernetes Cluster
Kubernetes, widely known as K8s, is the de facto standard for container orchestration. It automates the deployment, scaling, and management of containerized applications, offering unparalleled efficiency for developers and businesses alike. This guide delves deep into what Kubernetes is, its installation methods, and an in-depth tutorial on setting up a Kubernetes cluster using Kubeadm, along with benefits, challenges, and real-world use cases.
1. What Is Kubernetes?
Kubernetes, or K8s, is an open-source container orchestration platform originally developed by Google. It manages containers at scale, providing features like automatic scaling, load balancing, self-healing, and seamless deployments. Kubernetes has become the backbone of modern software development and deployment.
Key Features of Kubernetes
- Automated Deployment: Deploy and manage applications with minimal manual intervention.
- Scalability: Automatically scale applications based on demand.
- Self-Healing: Restart failed containers and replace unhealthy nodes automatically.
- Declarative Configuration: Manage resources using YAML or JSON manifests.
Learn more at the Kubernetes official documentation.
2. Why Kubernetes Matters
As businesses transition to cloud-native architectures, Kubernetes offers:
- Improved Resource Utilization: Optimize hardware usage by running multiple containers on the same infrastructure.
- Increased Deployment Velocity: Enable rapid, iterative deployments with minimal downtime.
- Seamless Integration: Works across public clouds, private data centers, and hybrid setups.
3. Installation Methods for Kubernetes
Depending on your use case, Kubernetes can be installed in several ways:
a. Play-with-K8s
A browser-based tool that allows you to create and explore Kubernetes clusters online.
- Pros: No setup required, perfect for learning and testing.
- Cons: Limited session durations and resources.
b. Minikube
Minikube is a lightweight Kubernetes distribution ideal for local development and testing. It creates a single-node cluster that acts as both the master and worker.
- Pros: Easy setup, no additional hardware required.
- Cons: Limited scalability; not suitable for production.
c. Kubeadm
Kubeadm is a CLI tool designed to bootstrap Kubernetes clusters. It’s one of the most popular methods for setting up multi-node clusters in production environments.
- Pros: Supports advanced configurations, highly scalable.
- Cons: Manual configuration required.
For more details, refer to the Kubeadm installation guide.
4. How to Install a Kubernetes Cluster with Kubeadm
This section provides a comprehensive step-by-step guide to setting up a Kubernetes cluster on AWS EC2 instances.
Prerequisites
- AWS account with EC2 instance access.
- Ubuntu 22.04 or later.
- Basic knowledge of Linux commands.
How to Install and Run a Kubernetes Cluster on Ubuntu
Step 1: Launch EC2 Instances
- Log in to the AWS Management Console.
- Navigate to the EC2 Dashboard and click Launch Instance.
- Configure:
- AMI: Ubuntu Server 22.04 LTS.
- Instance Type:
- Master Node:
t2.medium. - Worker Nodes:
t2.micro.
- Master Node:
- Set up security groups to allow all traffic (for simplicity in this tutorial).
- Launch:
- 1 Master Node
- 2 Worker Nodes
Step 2: Set Hostnames
Assign meaningful hostnames to your nodes:
sudo hostnamectl set-hostname master-node
For worker nodes:
sudo hostnamectl set-hostname worker-node1
sudo hostnamectl set-hostname worker-node2
Step 3: Disable Swap
Kubernetes requires swap to be disabled:
sudo swapoff -a
sudo sed -i '/ swap / s/^/#/' /etc/fstab
Step 4: Install Containerd
- Install and configure containerd as the container runtime:
sudo apt-get update sudo apt-get install -y containerd sudo mkdir -p /etc/containerd containerd config default | sudo tee /etc/containerd/config.toml sudo systemctl restart containerd - Enable required kernel modules:
sudo modprobe overlay sudo modprobe br_netfilter 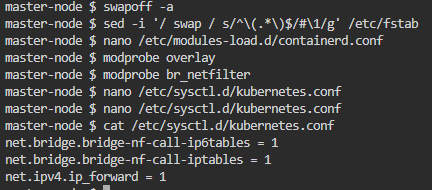 Apply sysctl settings:
sudo tee /etc/sysctl.d/kubernetes.conf <<EOF
net.bridge.bridge-nf-call-ip6tables = 1
net.bridge.bridge-nf-call-iptables = 1
net.ipv4.ip_forward = 1
EOF
sudo sysctl --system
Step 5: Install Kubernetes Components
Add the Kubernetes repository and install kubeadm, kubelet, and kubectl:
sudo apt-get update
sudo apt-get install -y apt-transport-https curl
sudo curl -fsSL https://pkgs.k8s.io/core:/stable:/v1.30/deb/Release.key | sudo gpg --dearmor -o /usr/share/keyrings/k8s-archive-keyring.gpg
echo "deb [signed-by=/usr/share/keyrings/k8s-archive-keyring.gpg] https://pkgs.k8s.io/core:/stable:/v1.30/deb/ /" | sudo tee /etc/apt/sources.list.d/kubernetes.list
sudo apt-get update
sudo apt-get install -y kubelet kubeadm kubectl
sudo apt-mark hold kubelet kubeadm kubectl
Step 6: Initialize the Kubernetes Master
- Run the initialization command:
sudo kubeadm init --pod-network-cidr=10.244.0.0/16 - Configure
kubectlfor the master node:mkdir -p $HOME/.kube sudo cp -i /etc/kubernetes/admin.conf $HOME/.kube/config sudo chown $(id -u):$(id -g) $HOME/.kube/config
Step 7: Set Up Pod Network
Install Flannel as the network add-on:
kubectl apply -f https://raw.githubusercontent.com/coreos/flannel/master/Documentation/kube-flannel.yml
Step 8: Join Worker Nodes
On each worker node, join the cluster using the token provided during the master node initialization:
sudo kubeadm join <master-ip>:6443 --token <token> --discovery-token-ca-cert-hash sha256:<hash>
Step 9: Verify Cluster Setup
- Check the node status:
kubectl get nodes - Check system resources:
kubectl get all -n kube-system
5. Use Cases of Kubernetes
- Microservices Management: Orchestrates microservices architecture efficiently.
- CI/CD Pipelines: Automates testing, deployment, and scaling.
- Hybrid Cloud Deployments: Seamlessly integrates on-premises and cloud environments.
- Big Data: Simplifies distributed data processing with frameworks like Apache Spark.
6. Benefits of Kubernetes
- Scalability: Auto-scales resources based on workload demand.
- Portability: Runs across any environment—cloud, on-premises, or hybrid.
- Cost Efficiency: Optimizes resource usage.
- High Availability: Maintains application uptime even during failures.
7. Challenges of Installing Kubernetes
- Complex Setup: Requires expertise for multi-node configurations.
- Resource Intensive: Demands high system resources.
- Learning Curve: Advanced features can be difficult to master.
8. FAQs on Kubernetes Installation
Q1. Can Kubernetes be installed on Windows?
Yes, using tools like Docker Desktop or Minikube.
Q2. What are the hardware requirements?
At least 2 CPUs and 2 GB RAM per node.
Q3. Is Kubernetes free?
Yes, Kubernetes is an open-source project.
9. Further Reading and Resources
With this comprehensive guide, you’re well-equipped to install and manage a Kubernetes cluster. Dive in, explore, and unleash the full potential of Kubernetes! 🚀