
🌐Configure Azure Site-to-Site VPN
🌟 Introduction
Azure Site-to-Site VPN provides a secure connection between an on-premises network and an Azure Virtual Network (VNet). It enables seamless hybrid cloud connectivity, allowing businesses to extend their infrastructure to the cloud while maintaining secure communication between resources.
In this guide, we’ll cover the step-by-step process to configure an Azure Site-to-Site VPN, discuss its key features, benefits, and troubleshooting tips for common issues.
💡 What is Azure Site-to-Site VPN?
Azure Site-to-Site VPN is a type of virtual private network that securely connects an on-premises network to Azure VNets over an encrypted tunnel. It is commonly used for hybrid cloud setups to enable communication between on-premises applications, servers, and cloud resources.
Common use cases include:
- Hybrid Cloud Deployments: Extend on-premises resources to Azure for scalability.
- Disaster Recovery: Create a secure failover site in Azure.
- Seamless Communication: Enable communication between on-premises and cloud applications.
✅ Key Features of Azure Site-to-Site VPN
- Secure Connectivity: Uses IPSec and IKE for encrypted communication.
- Always-On: Provides persistent, reliable connections between sites.
- Scalable: Connect multiple on-premises networks to Azure using multiple VPN gateways.
- Protocol Support: Supports standard VPN protocols for compatibility with various on-premises devices.
- Integration with Azure Services: Easily integrate with VNets, Azure Virtual Machines, and other Azure resources.
💡 Benefits of Configuring Azure Site-to-Site VPN
- Hybrid Cloud Enablement: Connect on-premises resources to Azure for scalability and flexibility.
- Cost-Effective: No need for expensive dedicated connections; use existing internet infrastructure.
- Improved Disaster Recovery: Securely replicate and failover resources to Azure during outages.
- Centralized Management: Manage cloud and on-premises networks from the Azure portal.
- Secure Communication: Ensure data is encrypted and secure while in transit.
🛠️ How to Configure Azure Site-to-Site VPN
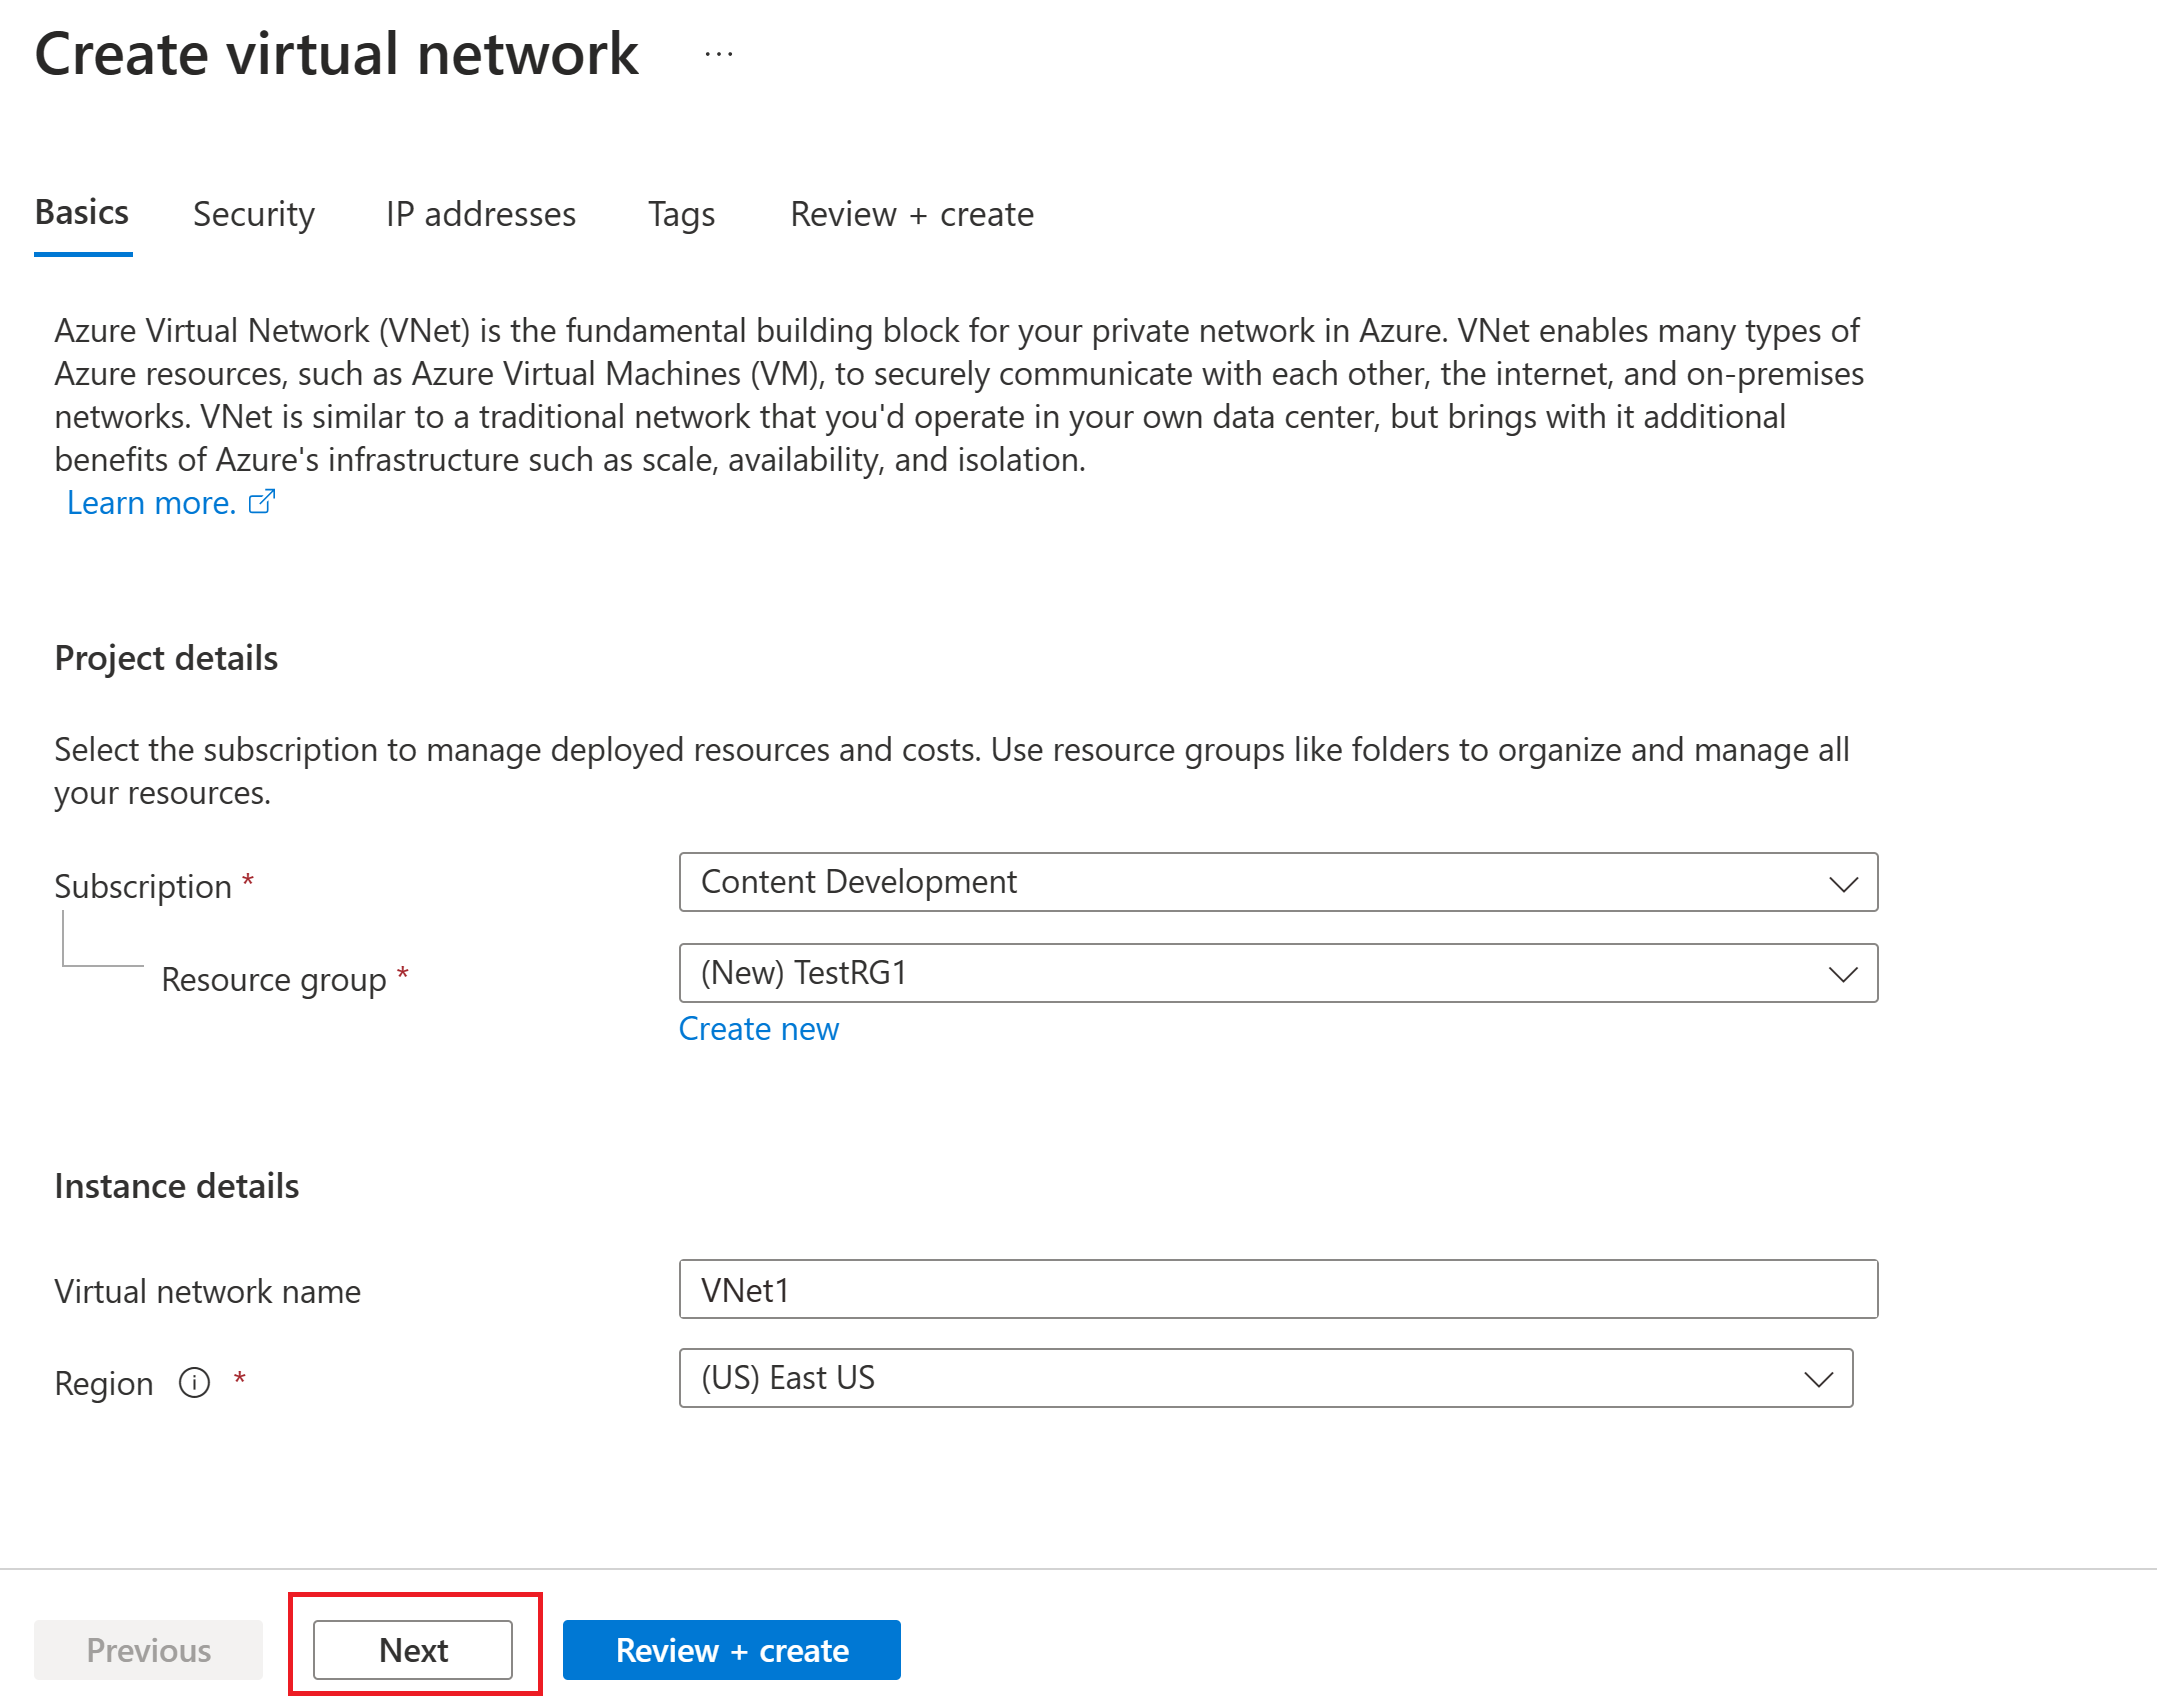
Step 1: Create a Virtual Network (VNet)
- Log in to the Azure Portal.
- Search for “Virtual Networks” in the search bar and click on it.
- Click + Create to create a new VNet:
- Name: Provide a name for your VNet (e.g.,
SiteToSiteVNet). - Address Space: Enter the IP range (e.g.,
10.1.0.0/16). - Subnets: Add at least one subnet (e.g.,
10.1.1.0/24). - Region: Choose the region closest to your on-premises location.
- Name: Provide a name for your VNet (e.g.,
- Click Create to deploy the VNet.
Step 2: Create a Virtual Network Gateway
- In the Azure portal, search for “Virtual Network Gateway” and click + Create.
- Configure the gateway:
- Name: Enter a name (e.g.,
SiteToSiteGateway). - Gateway Type: Select VPN.
- VPN Type: Choose Route-based.
- Virtual Network: Select the VNet you created earlier.
- Public IP Address: Create a new public IP for the gateway.
- Name: Enter a name (e.g.,
- Click Create to deploy the gateway. (Note: This process can take 20–30 minutes.)

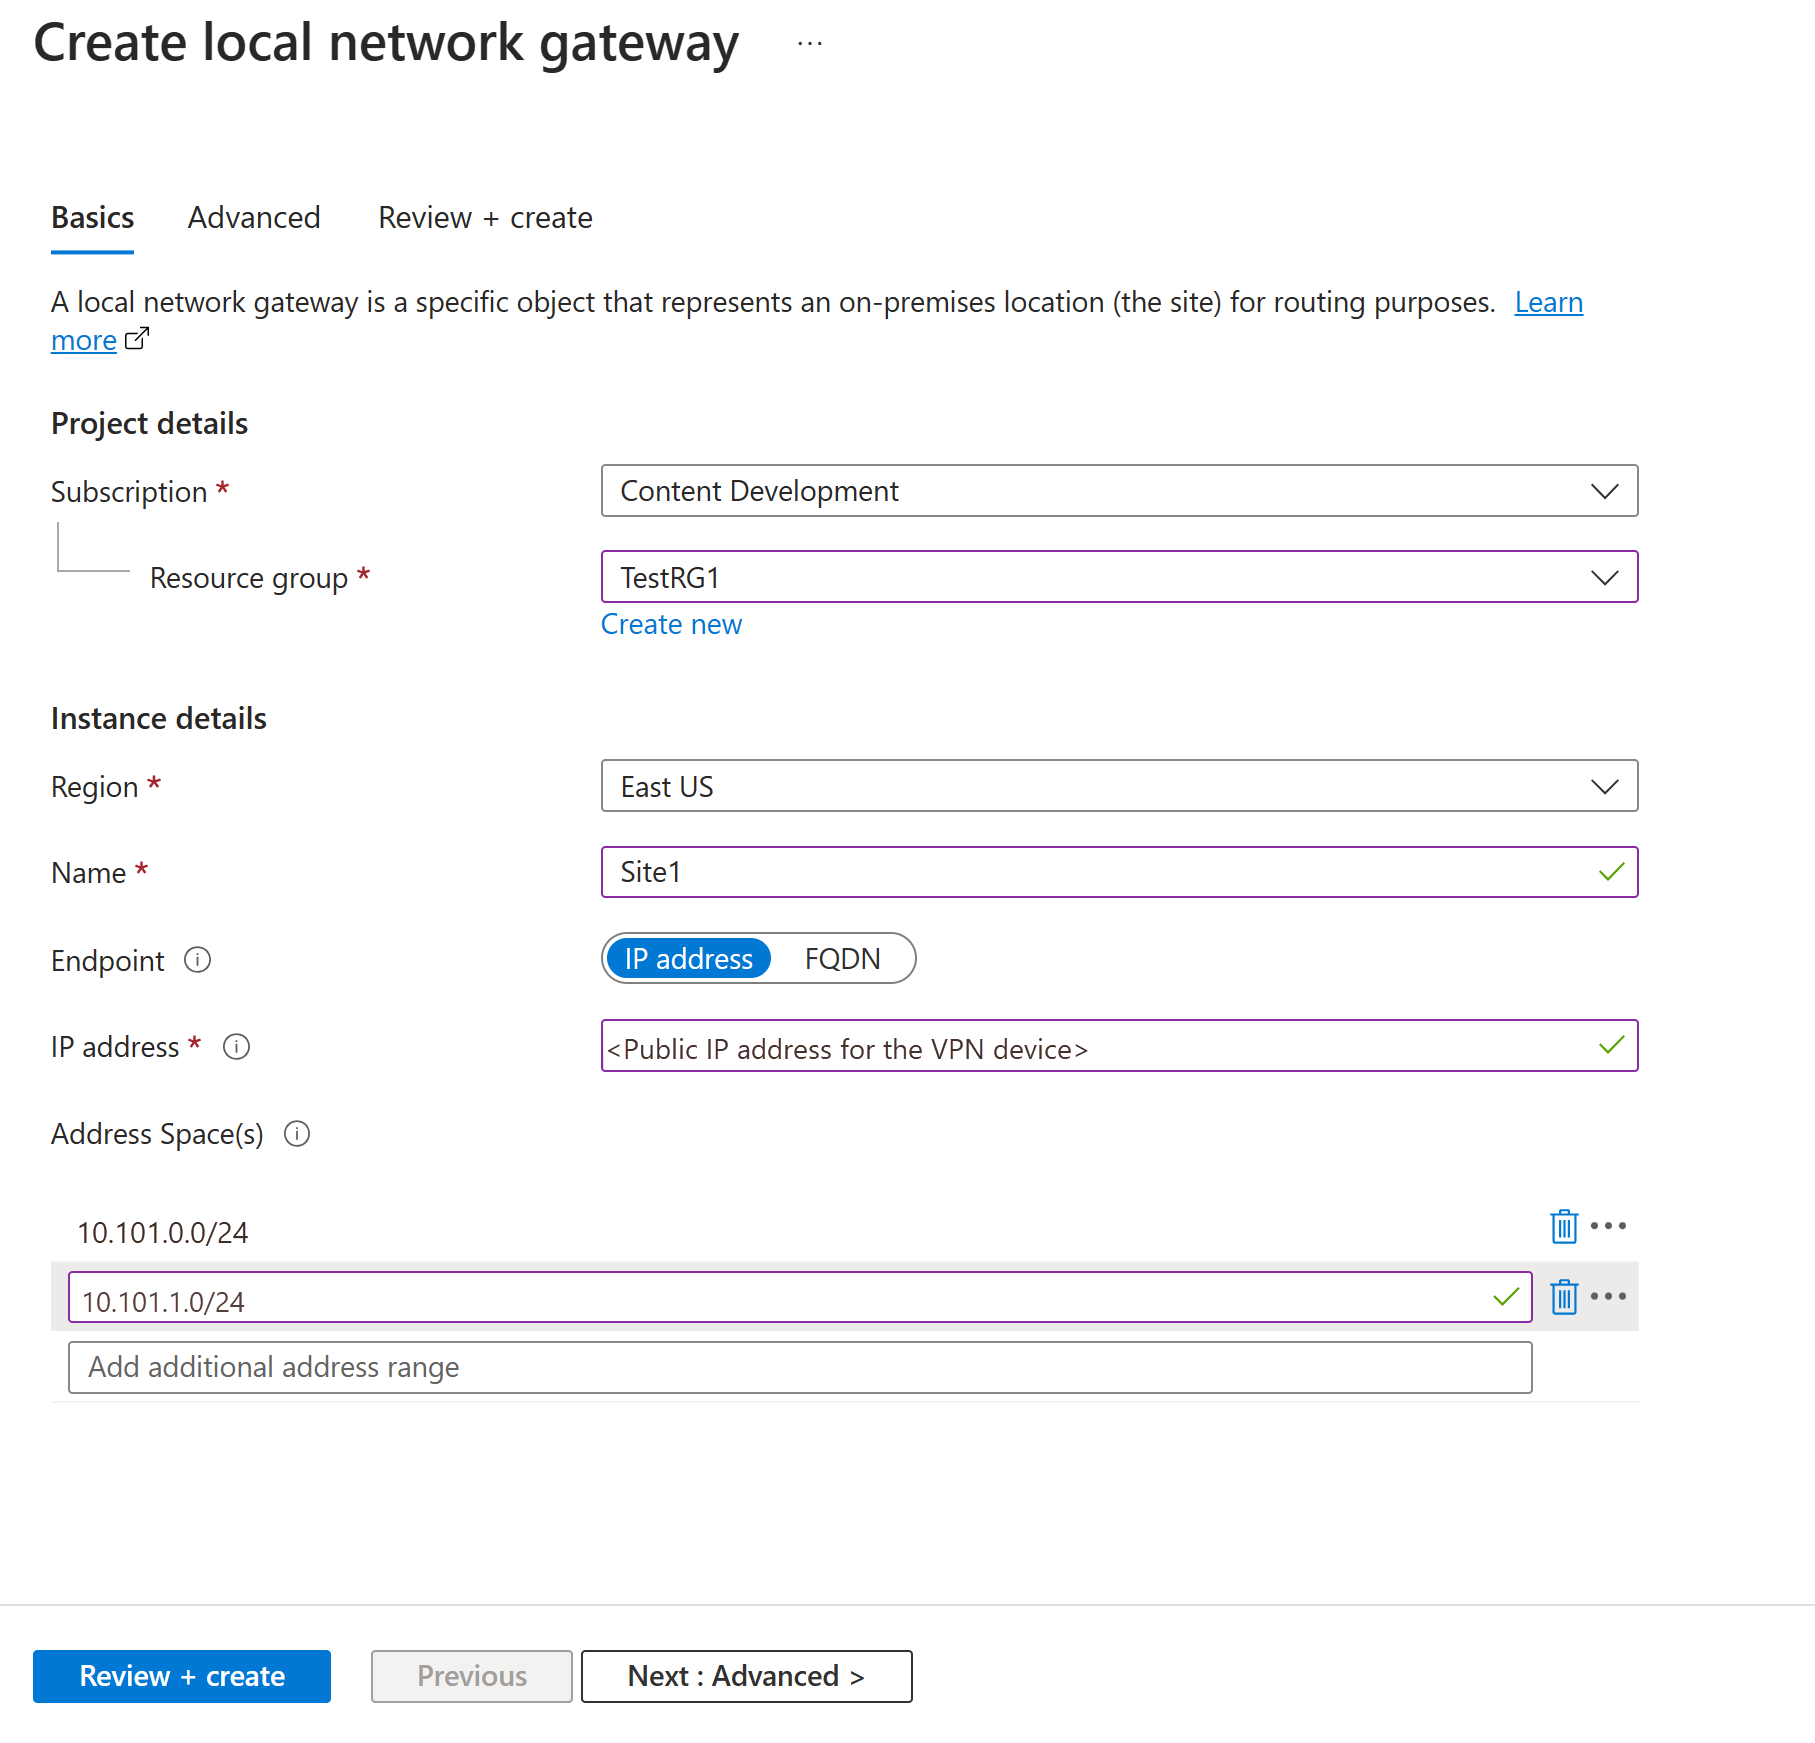
Step 3: Configure the Local Network Gateway
- Search for “Local Network Gateway” in the Azure portal and click + Create.
- Enter the following details:
- Name: Enter a name (e.g.,
OnPremisesGateway). - IP Address: Provide the public IP address of your on-premises VPN device.
- Address Space: Enter the IP address range of your on-premises network (e.g.,
192.168.1.0/24).
- Name: Enter a name (e.g.,
- Click Create.
Step 4: Establish the VPN Connection
- Go to the Virtual Network Gateway you created.
- Under Settings, click Connections, then click + Add.
- Configure the connection:
- Name: Enter a name for the connection (e.g.,
OnPremToAzureVPN). - Connection Type: Select Site-to-Site (IPSec).
- Local Network Gateway: Select the local gateway created earlier.
- Shared Key: Enter a shared key (PSK) for the connection. Make sure this matches the configuration on your on-premises VPN device.
- Name: Enter a name for the connection (e.g.,
- Click OK to create the connection.
Step 5: Configure Your On-Premises VPN Device
- Log in to your on-premises VPN device’s management console.
- Add a new VPN connection using the following settings:
- Azure Gateway Public IP Address: Use the public IP of your Azure Virtual Network Gateway.
- Shared Key: Enter the same shared key (PSK) used in Azure.
- Tunnel Mode: Use IPsec with IKEv2 or IKEv1, depending on your device’s compatibility.
- Save and test the connection.
⚙️ Troubleshooting Common Issues
- VPN Connection Fails:
- Ensure the IP ranges of your VNet and on-premises network do not overlap.
- Verify that the VPN device supports IPsec/IKE protocols.
- Authentication Issues:
- Confirm that the pre-shared key (PSK) matches on both sides.
- Slow Connection Speeds:
- Upgrade to a higher VPN gateway SKU to increase throughput.
- Connection Drops Frequently:
- Ensure the VPN device’s keep-alive settings match Azure’s settings.
Best Practices for Azure Site-to-Site VPN
- Use Non-Overlapping IP Ranges: Ensure that the IP ranges for Azure VNets and on-premises networks do not overlap.
- Enable Redundancy: Use multiple VPN connections or an ExpressRoute for critical workloads.
- Monitor Connectivity: Use Azure Monitor to track VPN connection health and performance.
- Secure Your VPN Device: Regularly update firmware and configure firewalls on your on-premises VPN device.
Advantages of Azure Site-to-Site VPN
- Secure Connectivity: Protects data with IPsec/IKE encryption, ensuring all communication is secure.
- No Hardware Dependency in Azure: Azure handles the VPN gateway, removing the need for additional cloud hardware.
- Cost-Effective Solution: Lower costs compared to dedicated connections like ExpressRoute.
- Flexible Integration: Works with most industry-standard VPN devices and supports multiple connection types.
- Support for Multiple Sites: Allows connections to multiple on-premises networks or branch offices.
Disadvantages of Azure Site-to-Site VPN
- Dependent on Internet Stability: Relies on a stable internet connection, which can lead to latency or downtime during outages.
- Performance Limits: Bandwidth and performance are limited by the VPN gateway SKU and internet connection.
- Complex Configuration: Requires careful planning of IP ranges, routing, and on-premises VPN device setup.
- Security Risks if Misconfigured: Incorrect configurations or weak pre-shared keys (PSKs) can expose vulnerabilities.
- Not Ideal for High-Volume Data Transfers: Large-scale data migrations may require faster alternatives like ExpressRoute.
🎯 Conclusion
Configuring an Azure Site-to-Site VPN is essential for enabling secure communication between your on-premises network and Azure VNets. With this guide, you can create a hybrid cloud environment, ensuring seamless connectivity for applications and resources.
Start configuring your Azure VPN today by logging into the Azure Portal. For more advanced configurations, explore the official Azure documentation.