

How to Create Vnet peering in Azure
Introduction
Azure Virtual Network (VNet) Peering allows seamless communication between virtual networks (VNets) in Azure, enabling resource sharing across regions or within the same region. VNet peering is a key feature for disaster recovery, database failovers, and cross-region replication. By bypassing the public internet, VNet peering ensures secure and private connectivity over Microsoft’s high-speed backbone network.
This article explores the essential concepts, types, benefits, and a step-by-step guide to setting up VNet peering, along with best practices, advantages, and troubleshooting tips.
What is Azure VNet Peering?
Azure VNet Peering connects two virtual networks, enabling them to communicate securely and privately. It allows traffic to flow seamlessly between VNets without exposing data to the public internet.
Use Cases:
- Database Failovers: Ensures smooth failover between regions during outages.
- Disaster Recovery: Facilitates cross-region backups.
- Cross-Region Replication: Enables data sharing between regions for high availability.
Importance of VNet Peering
VNet peering simplifies network management and enhances performance by creating direct connections between VNets.
Key Benefits:
- Enhanced Security:
Data travels over Microsoft’s private backbone network, avoiding the public internet. - Improved Performance:
Offers low-latency, high-bandwidth communication between peered VNets. - Scalability:
Automatically adjusts to increased traffic as your Azure environment grows. - Cost Efficiency:
Reduces the need for costly VPN gateways for cross-region connectivity.
Types of VNet Peering
Azure offers two types of VNet peering:
- VNet Peering (Intra-Region):
Connects VNets within the same Azure region. Ideal for sharing resources like virtual machines (VMs) and databases. - Global VNet Peering (Inter-Region):
Connects VNets across different Azure regions. Provides private peering with low latency and high bandwidth over Azure’s backbone infrastructure.
Pre-Checks Before Configuring VNet Peering
Before setting up VNet peering, ensure the following:
- Non-Overlapping IP Address Spaces:
The address ranges of the VNets must not overlap. - Transitivity Limitation:
VNet peering is not transitive. For example:- If VNet A peers with VNet B, and VNet B peers with VNet C, VNet A cannot communicate with VNet C.
- Basic Load Balancer Restriction:
Resources in a peered VNet cannot connect to a basic load balancer’s front-end IP. - Address Range Modifications:
Once peering is established, adding or deleting IP address ranges in the peered VNets is disabled.
Benefits of VNet Peering
- Private Communication:
All traffic between peered VNets remains private. - Cross-Model and Subscription Data Sharing:
Allows data transfer across different Azure deployment models, subscriptions, and regions. - No Downtime:
Ensures zero downtime when configuring or using VNet peering. - High Bandwidth and Low Latency:
Ensures reliable and fast data transfer. - Cost Savings:
Eliminates the need for VPN encryption, gateways, or public internet routing.
How to Create Vnet peering in Azure
Step 1: Log in to Azure Portal
Navigate to the Azure Portal and sign in with your Azure account.
Step 2: Create Virtual Networks
- Create two VNets (e.g., VNet1 and VNet2) in the same or different Azure regions:
- Specify address spaces that do not overlap.
Step 3: Configure VNet Peering
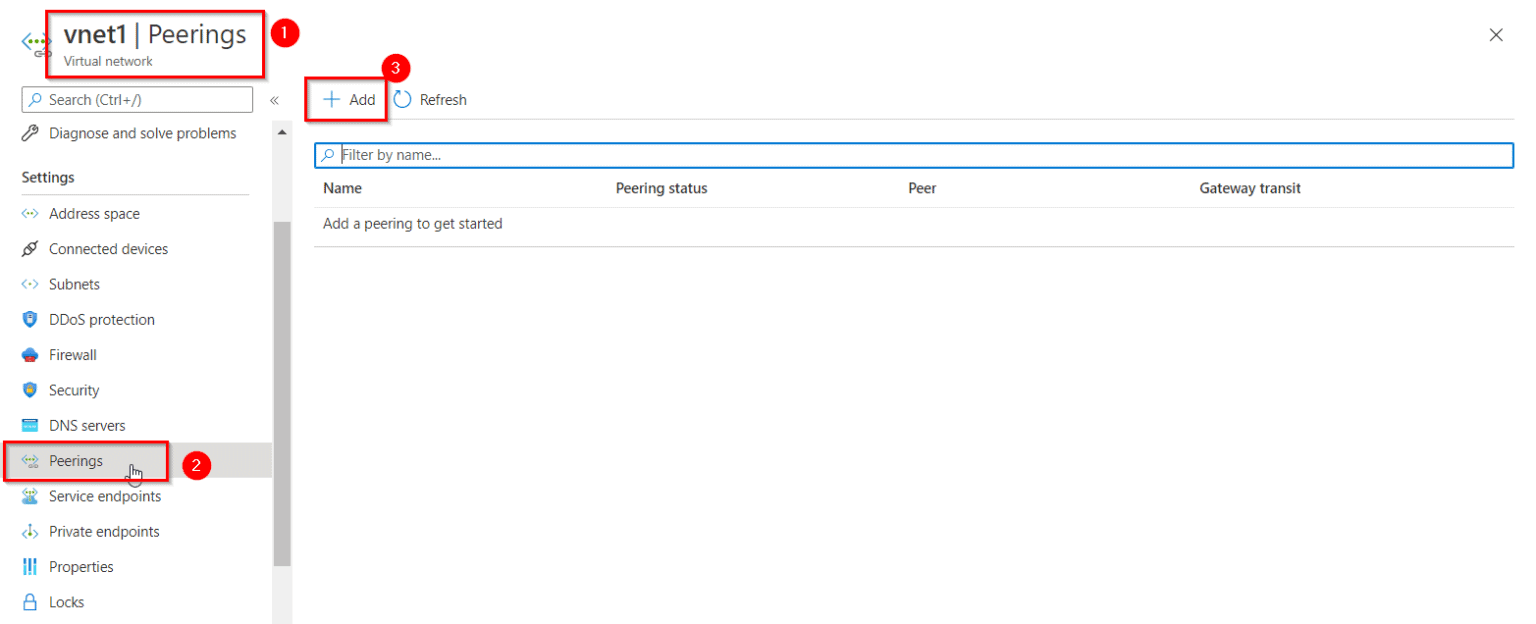
- Go to VNet1 in the Azure Portal.
- Under Settings, select Peerings and click Add.
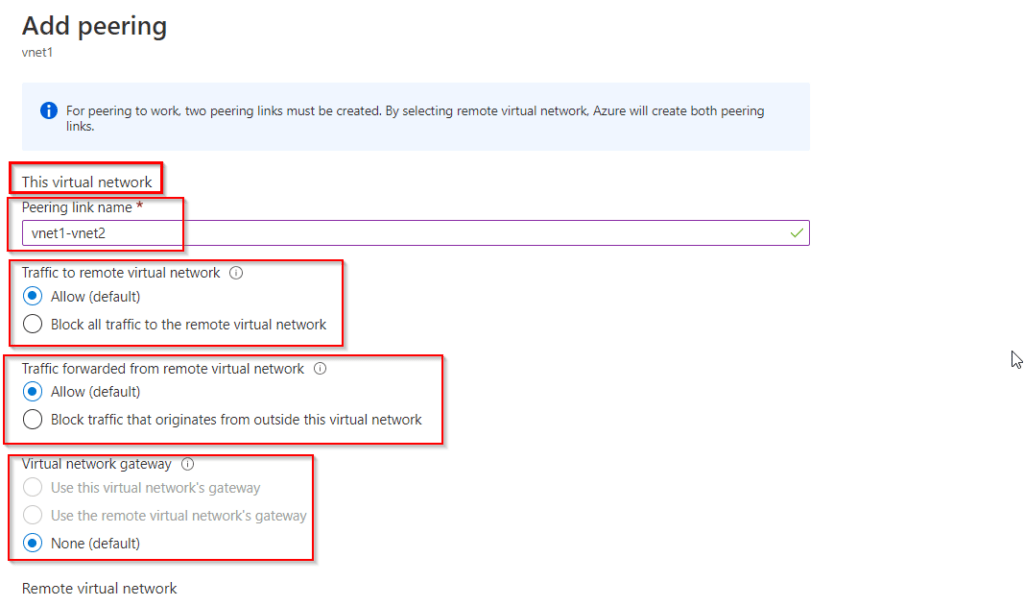
- Provide the following details:
- Peering Link Name: Unique name for the peering (e.g., VNet1-to-VNet2).
- This Virtual Network: VNet1.
- Remote Virtual Network: VNet2.
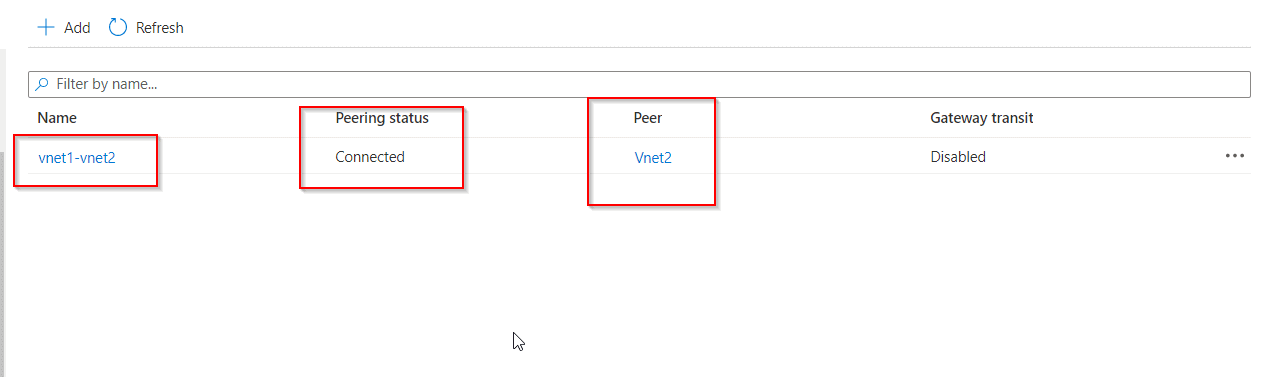
- Click Add to establish the peering.
Step 4: Test Connectivity
- Deploy a VM in each VNet.
- Connect to one VM (e.g., VM1 in VNet1).
- Ping the private IP of the second VM (e.g., VM2 in VNet2):
- Verify successful connectivity with 100% packet delivery.
Best Practices for VNet Peering
- Use Network Security Groups (NSGs):
Apply NSGs to manage inbound and outbound traffic between VNets. - Enable Network Policies:
Use Azure Policy to enforce compliance across peered VNets. - Monitor Traffic:
Use Azure Monitor to track network traffic and detect anomalies. - Avoid Overlapping IP Ranges:
Plan your address spaces carefully to prevent conflicts. - Regular Audits:
Periodically review peering configurations and ensure they align with organizational needs.
Advantages of VNet Peering
- Simplified Management:
Eliminates the need for complex routing configurations. - Improved Security:
Keeps all traffic within Azure’s private network. - Cost Reduction:
Avoids the expense of VPN gateways and public internet usage. - Enhanced Performance:
Offers faster communication between VNets compared to traditional methods. - Scalability:
Supports large-scale deployments across regions.
Disadvantages of VNet Peering
- Non-Transitivity:
Requires explicit peering configurations between each pair of VNets. - Static Address Ranges:
Address ranges cannot be modified once peering is established. - Limited Protocol Support:
Basic load balancers and certain configurations may not work seamlessly. - Cross-Billing Challenges:
Managing costs across subscriptions can become complex.
Troubleshooting VNet Peering
1. Ping Fails Between VMs
- Ensure ICMP is allowed through the Windows Firewall.
- Verify NSG rules permit traffic between VNets.
2. Peering Status is Not Connected
- Refresh the Azure Portal.
- Check for overlapping IP address spaces.
3. Connectivity Issues
- Ensure both VNets are correctly configured for peering.
- Verify that no NSG or route table blocks traffic.
4. Performance Issues
- Use Azure Monitor to identify bottlenecks.
- Scale resources if required.
Conclusion
Azure VNet Peering is a powerful feature that simplifies connectivity and resource sharing across virtual networks, either within the same region or across regions. With its robust security, low-latency performance, and cost-effectiveness, VNet peering is an essential tool for building scalable and secure Azure environments.
By following this guide, you can confidently configure and manage VNet peering for your applications. For advanced scenarios, consider integrating VNet peering with Azure Monitor, Azure Policy, and other networking tools to maximize efficiency.
For more details, visit the Azure VNet Peering Documentation.