
How to Fork a GitHub Repository
GitHub is a powerful platform for managing Git repositories, facilitating seamless collaboration among developers. Forking a GitHub repository is an essential practice, allowing you to create your own copy of a repository hosted on GitHub. This feature is particularly useful for contributing to open-source projects, experimenting with new changes, or developing features independently before merging them into the original repository.
how to fork a repository on GitHub and incorporate advanced Git commands like git commit -a and git rebase -i to streamline the development workflow.
📌 Table of Contents
- What is GitHub Repository Forking?
- Why Should You Fork a Repository?
- How to Fork a Repo in GitHub?
- Forking a GitHub Repository Using Command Line
- How to Keep Your Forked Repository Updated?
- How to Delete a Forked Repository?
- GitHub Fork vs. Clone: Key Differences
- Conclusion
💡 What is GitHub Repository Forking?
A fork is an independent copy of a repository that allows you to modify the code without affecting the original project. Forking is widely used in open-source development, enabling contributors to work on improvements, fix bugs, or add features before submitting their changes via pull requests.
When you fork a repository:
- It is copied to your GitHub account.
- You have full control over the forked repository.
- You can push commits, create branches, and work independently.
- The original repository (upstream) remains unaffected unless you submit a pull request.
🔍 Why Should You Fork a Repository?
Forking a GitHub repository serves various purposes:
- Contributing to Open-Source Projects: Allows contributors to suggest and implement changes.
- Experimentation & Feature Development: Work on new features without affecting the main repository.
- Bug Fixes & Enhancements: Modify code and test improvements in an isolated environment.
- Learning & Practice: New developers can fork projects to learn from well-structured repositories.
🔧 How to Fork a GitHub Repository?
Forking a repository in GitHub is a simple process. Follow the steps below:
Step 1: Open the Repository
Navigate to the GitHub repository you want to fork. For example: 🔗 GitHub React Repository
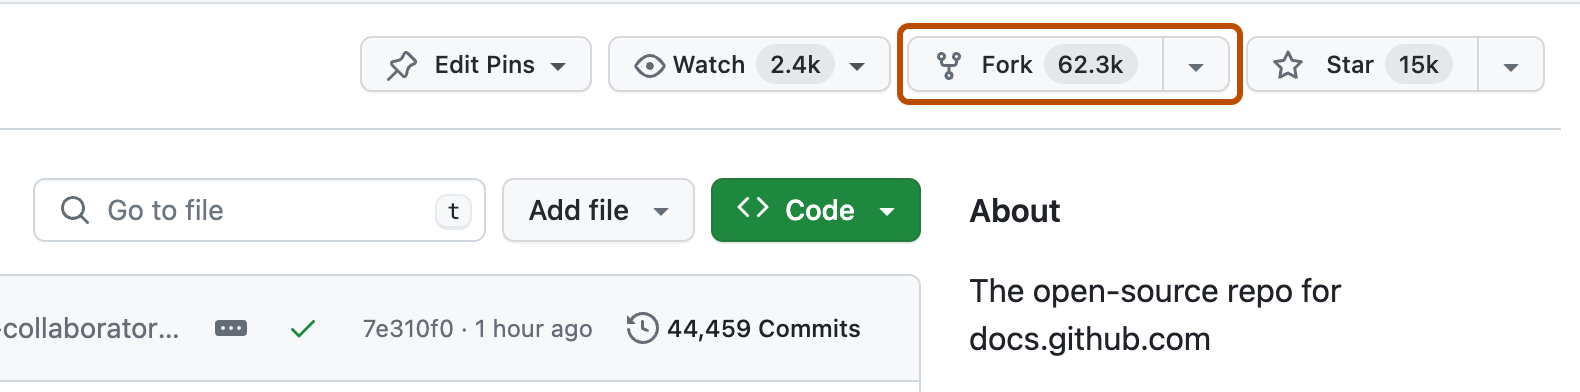
Step 2: Click the Fork Button
In the top-right corner, you’ll see a Fork button. Click on it.
📌 Screenshot:
Step 3: Confirm Forking
GitHub will create a copy of the repository under your account. You can find the forked repository at:
https://github.com/your-username/repository-name
Step 4: Clone Your Fork Locally
Once your repository is forked, you need to clone it to your local machine using:
git clone https://github.com/your-username/repository-name.git
🔥 Forking a GitHub Repository Using Command Line
If you prefer using the command line (Git Bash, Terminal, or CLI) instead of the GitHub web interface, follow these steps:
Step 1: Install & Verify GitHub CLI
Before forking, ensure GitHub CLI is installed. Run:
gh --version
If not installed, download it from:
🔗 GitHub CLI
Step 2: Authenticate GitHub CLI
Log in to GitHub via CLI:
gh auth login --web
Step 3: Fork the Repository via CLI
After authentication, use the following command to fork the repository:
gh repo fork <REPO URL> --clone
For example:
gh repo fork https://github.com/facebook/react --clone
Making and Committing Changes Efficiently Using git commit -a
After forking and cloning the repository, you may want to modify files and commit them efficiently. Instead of staging files manually using git add ., you can use the git commit -a command.
What Does git commit -a Do?
- The
-aflag tells Git to automatically stage all modified files before committing. - This is useful for quick commits when adding multiple changes at once.
Example Usage
This command:
- Stages all modified files.
- Commits the changes with the specified message.
Note: git commit -a does NOT stage new files that haven’t been added before. For new files, use git add filename before committing.
Interactive Rebasing with git rebase -i
If you have multiple commits and want to clean up your commit history before pushing to GitHub, you can use interactive rebase (git rebase -i).
What is git rebase -i?
git rebase -iallows you to rearrange, edit, squash, or delete commits.- It is useful before submitting a pull request to keep the commit history clean.
Example Usage
-
List the last few commits:
Output:
🔄 How to Keep Your Forked Repository Updated?
Since the original repository (upstream) may receive new updates, you should keep your fork in sync. Follow these steps:
Step 1: Add the Upstream Repository
Navigate to the forked repository and add the original repository as an upstream:
cd repository-name
git remote add upstream https://github.com/original-user/repository-name.git
Step 2: Fetch the Latest Changes
Pull the latest changes from the upstream repository:
git fetch upstream
Step 3: Merge Changes
Switch to the main branch and merge updates:
git checkout main
git merge upstream/main
Step 4: Push Changes to Your Fork
Finally, push the updates to your forked repository:
git push origin main
🗑️ How to Delete a Forked Repository?
If you no longer need a forked repository, you can delete it.
Steps to Delete a Forked Repository
- Go to your repository on GitHub.
- Navigate to Settings (bottom left).
- Scroll down to the “Danger Zone” section.
- Click on “Delete this repository” and confirm.
📌 Screenshot:

⚠️ Note: Deleting a repository is permanent. Ensure you have backups before proceeding.
⚖️ GitHub Fork vs. Clone: Key Differences
| Feature | Fork | Clone |
|---|---|---|
| Purpose | Creates an independent copy on GitHub | Creates a local copy on your computer |
| Location | Stored on your GitHub account | Stored on your local machine |
| Ownership | You own the forked repository | You do not own the cloned repository |
| Collaboration | Used for contributing to external repositories | Used for local development |
| Merge Changes | Requires a pull request | Directly merges to the remote repository |
📌 Conclusion
Forking a GitHub repository is a powerful tool that allows developers to work independently on a project, contribute to open-source, and maintain separate development branches. Whether you’re a beginner or an experienced developer, understanding forking and managing repositories effectively is crucial for collaboration.
By following the steps in this guide, you now know:
- How to fork a repository using GitHub UI and command line.
- How to sync a forked repository with the original.
- How to delete a fork if no longer needed.
- The differences between fork and clone.
Forking provides collaboration, experimentation, and contribution opportunities for developers, making GitHub an essential tool for modern software development.
🔗 Official Links:
- GitHub Forking Documentation: GitHub Docs
- GitHub CLI Documentation: GitHub CLI
- GitHub Learning Lab: GitHub Learning
Learn more about forking a private repository github