

⚙️How to Configure Autoscaling in GCP
Optimize your GCP workloads by dynamically scaling your resources to handle traffic spikes effectively.
Autoscaling is a powerful feature in Google Cloud Platform (GCP) that dynamically adjusts the number of virtual machine (VM) instances in a managed instance group (MIG) based on workload demands. It ensures optimal performance during traffic spikes while minimizing costs during low-demand periods by automatically adding or removing resources.
🌟 Why Autoscaling is Important
Autoscaling in Google Compute Engine ensures your infrastructure adapts to fluctuating workloads by automatically increasing or decreasing the number of instances in a managed instance group. It helps you:
- Handle traffic spikes without manual intervention.
- Save costs by reducing instances during low traffic.
- Enhance the reliability and scalability of your applications.
👉 Learn more about Google Compute Engine Autoscaler.
Key Benefits of Autoscaling in GCP
- Cost Optimization: Reduce costs by scaling down resources during idle times.
- Performance Improvement: Automatically scale up resources to handle traffic spikes.
- Reliability and Fault Tolerance: Autoscaling ensures that your applications remain highly available even during unexpected demand surges.
- Operational Efficiency: No manual intervention is needed to adjust resources, saving time and effort.
Types of Autoscaling in GCP
GCP offers various types of autoscaling depending on your specific workload and application requirements:
1. Horizontal Autoscaling
This is the most common type of autoscaling in GCP. It adjusts the number of instances in a managed instance group based on metrics like CPU utilization, HTTP traffic, or custom metrics.
Key Features:
- Automatically increases or decreases the number of VMs.
- Suitable for stateless applications or services where instances can be added or removed without impact.
- Metrics-driven scaling (e.g., CPU, memory, requests per second).
Use Cases:
- Web applications
- Backend APIs
- Batch processing jobs
2. Vertical Autoscaling
Vertical autoscaling adjusts the resource configuration (e.g., CPU and memory) of a single instance rather than adding or removing instances.
Key Features:
- Dynamically increases or decreases an instance’s resources based on workload.
- Applicable for workloads that cannot be distributed across multiple instances.
Use Cases:
- Database servers
- Memory-intensive applications
- Applications with low horizontal scalability
3. Predictive Autoscaling
Predictive autoscaling uses machine learning to forecast future demand based on historical data. It proactively scales resources before a traffic spike occurs, ensuring optimal performance.
Key Features:
- Analyzes past traffic patterns and predicts future load.
- Combines with reactive autoscaling for maximum efficiency.
- Reduces latency during high-demand periods by scaling in advance.
Use Cases:
- E-commerce websites during sales events
- Streaming platforms
- Seasonal workloads
How Autoscaling Works in GCP
Autoscaling operates on a Managed Instance Group (MIG), which contains a group of identical VM instances created from the same instance template. The autoscaler continuously monitors predefined metrics and adjusts the number of instances accordingly.
Metrics for Autoscaling in GCP
- CPU Utilization
- Autoscaler adds more instances when average CPU usage exceeds a threshold.
- Example: Scale up when CPU utilization is above 70% and scale down when below 30%.
- Load Balancing Usage
- Monitors HTTP(S) traffic routed through a load balancer.
- Adds instances when requests per second exceed a certain threshold.
- Cloud Monitoring Custom Metrics
- Allows you to define custom metrics like disk usage, memory usage, or application-specific KPIs.
- Example: Scale based on active user sessions or database query load.
- Queue-Based Metrics
- Monitors task queues or message queues (e.g., Pub/Sub).
- Scales resources when the number of unprocessed tasks exceeds a threshold.
- Stackdriver Monitoring Alerts
- Triggers autoscaling based on Stackdriver monitoring alerts for specific performance indicators.
How to Configure Autoscaling in GCP
🔧 Step 1: Prepare an Instance for Autoscaling
Before setting up autoscaling, you need to create an instance template that serves as the blueprint for dynamically created instances. Follow these steps:
1. Launch an Instance
- Go to the Compute Engine section in your Google Cloud Console.
- Click Create Instance.
- Choose your preferred machine type, region, and zone.
2. Install Required Software
- SSH into the instance using the Google Cloud Console or your preferred terminal.
- Install the necessary packages:
sudo apt update sudo apt install apache2 php libapache2-mod-php - Deploy your application code to the server.
- Test the application to ensure it’s working correctly.
3. Add Startup Scripts
Startup scripts ensure that each instance automatically initializes during creation. For example, you can pull the latest code from a Git repository:
#!/bin/bash
sudo apt update
sudo apt install -y apache2 php git
cd /var/www/html
git clone https://github.com/your-repo/your-project.git .
4. Disable Boot Disk Deletion
- In the instance settings, disable the Delete Boot Disk option.
- This allows you to delete the instance later without losing the boot disk.
🖼️ Step 2: Create an Instance Template
An instance template defines the configuration for instances in a managed instance group. Here’s how to create one:
- Navigate to the Instance Templates section in the Google Cloud Console.
- Click Create Instance Template.
- Specify the machine type, boot disk, and startup script you configured earlier.
- Save the template for use in the next steps.

📦 Step 3: Create a Managed Instance Group
A managed instance group (MIG) uses the instance template to manage the lifecycle of instances. Follow these steps:
- Go to the Instance Groups section in the Google Cloud Console.
- Click Create Instance Group.
- Select the option for a Managed Instance Group.
- Choose the instance template you created earlier.
- Define the initial number of instances and specify the region or zone.

📈 Step 4: Configure Autoscaling Policies
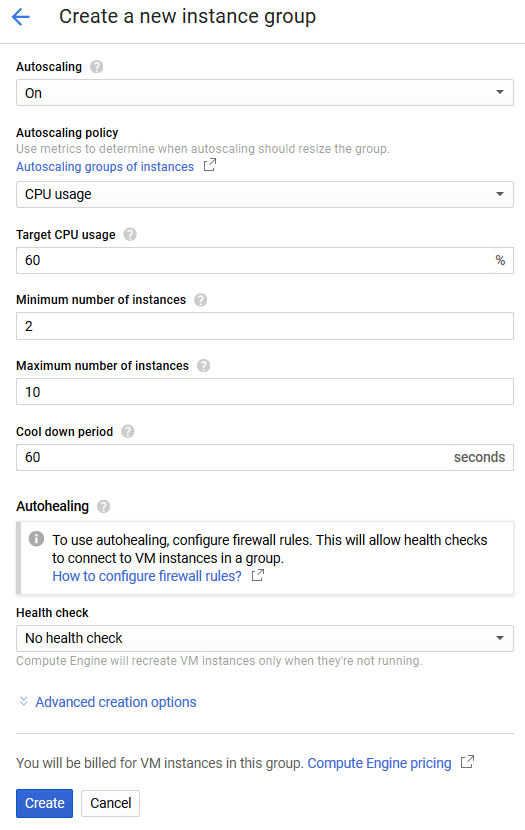
Autoscaling policies define how the instance group scales up or down based on metrics like CPU utilization, HTTP load balancing, or custom metrics. Here’s how to configure them:
- Go to the Instance Groups page and select your managed instance group.
- Click Edit Autoscaling.
- Choose a scaling metric:
- CPU Utilization: Set a target CPU usage percentage, e.g., 60%.
- HTTP Load Balancing: Scale based on backend service load.
- Custom Metrics: Use Stackdriver Monitoring to define custom scaling policies.
- Specify the minimum and maximum number of instances to maintain.
- Save the autoscaling configuration.
🔍 Step 5: Test Your Autoscaler
To verify that your autoscaler is working as expected:
- Simulate traffic by sending requests to your application.
- Monitor the instance group in the Google Cloud Console to see if new instances are created dynamically.
- Reduce traffic and observe if instances are scaled down as expected.
👉 Check out the Cloud Monitoring service for detailed insights into your autoscaling behavior.
Best Practices for Autoscaling in GCP
- Set Minimum and Maximum Limits:
- Define limits to ensure you don’t scale down to zero instances or exceed your budget.
- Use Predictive Autoscaling for Seasonal Workloads:
- Enable predictive autoscaling for workloads with predictable traffic patterns, such as retail sites during sales or streaming platforms during peak hours.
- Monitor Resource Usage:
- Use Cloud Monitoring to track scaling behavior and fine-tune policies.
- Leverage Startup Scripts:
- Ensure all instances initialize correctly by using startup scripts to configure services, pull code, or run commands during boot.
- Test Autoscaling Policies:
- Simulate traffic patterns to verify the scaling behavior and adjust policies accordingly.
- Optimize Instance Templates:
- Use cost-effective machine types and preemptible VMs if possible to minimize costs.
Use Cases of Autoscaling in GCP
- E-Commerce Websites
- Handle sudden traffic surges during sales, promotions, or festive seasons.
- Video Streaming Services
- Scale up during live events or prime-time hours and scale down during low-demand periods.
- Batch Processing
- Automatically add instances to process queued tasks and reduce instances once tasks are completed.
- Gaming Platforms
- Manage unpredictable traffic spikes in multiplayer online games.
- APIs and Microservices
- Scale backend services based on the number of requests per second.
Conclusion
Autoscaling in GCP is a robust solution for modern applications that require dynamic scalability and cost efficiency. Whether you’re hosting a global web application, running real-time streaming services, or managing batch processing tasks, GCP’s autoscaling options can handle unpredictable workloads seamlessly.
By configuring autoscaling with metrics like CPU utilization, HTTP load balancing, or custom KPIs, and leveraging predictive autoscaling, you can ensure that your applications remain performant and cost-effective. For more details, check Google Cloud Autoscaler Documentation.