
How to Create a Storage Account in Azure
Introduction
Azure Storage Accounts provide a flexible, scalable, and secure solution for storing data in the cloud. Whether you are dealing with large-scale data analytics, application files, or static website content, Azure Storage offers a variety of options to meet your needs. This guide will walk you through the step-by-step process of creating a storage account in Azure, highlight best practices, and help you understand the different configurations available.
Creating a storage account is one of the foundational steps in developing cloud-based solutions on Azure. Storage accounts can store objects like blobs, tables, files, and queues, each serving different use cases. This tutorial is designed to help users of all experience levels understand how to effectively deploy and manage Azure Storage Accounts.
Why Use Azure Storage Accounts?
Azure Storage Accounts offer multiple benefits that make them an essential component of cloud architecture. Key benefits include:
- Scalability – Azure Storage can handle petabytes of data and dynamically scale to meet application demands.
- Security – With encryption at rest and in transit, Azure ensures your data is protected. Access can be controlled using shared keys, SAS tokens, and Active Directory integration.
- Durability and Redundancy – Azure replicates your data within or across regions to ensure high availability and fault tolerance.
- Versatility – Supports various data types including unstructured data (blobs), structured data (tables), and messaging (queues).
- Cost-Effectiveness – Different storage tiers (Hot, Cool, Archive) allow you to optimize costs based on access frequency.
Types of Storage in Azure
Azure Storage Accounts support different types of data services, each tailored for specific scenarios:
- Blob Storage – Stores unstructured data such as documents, videos, and backup files.
- File Storage – Provides managed file shares accessible via SMB protocol, often used for lift-and-shift migrations.
- Table Storage – NoSQL key-value store for large-scale structured data.
- Queue Storage – Message queue service that enables reliable messaging between distributed applications.
Prerequisites
-
- Azure Subscription – If you don’t have one, you can create a free Azure account.
- Basic Networking and Storage Knowledge – Understanding storage types, regions, and performance tiers will help you make informed decisions.
- Access to the Azure Portal – Log into the Azure portal with your Microsoft credentials.
How to Create a Storage Account in Azure
Step 1: Log in to Azure Portal
- Visit the Azure Portal.
- Sign in using your Azure credentials.
Step 2: Create a New Resource
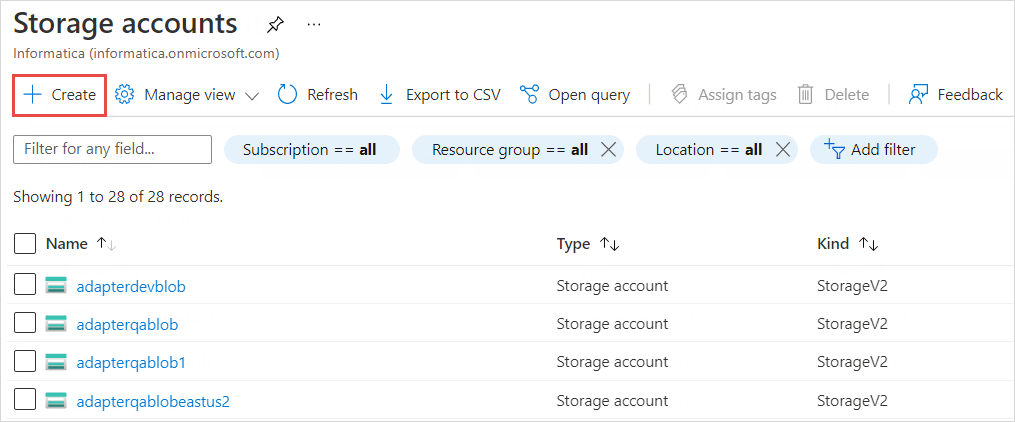
- From the Azure homepage, click on Create a resource in the left-hand menu.
- In the search bar, type Storage Account and select the option that appears.
- Click Create to begin the process.
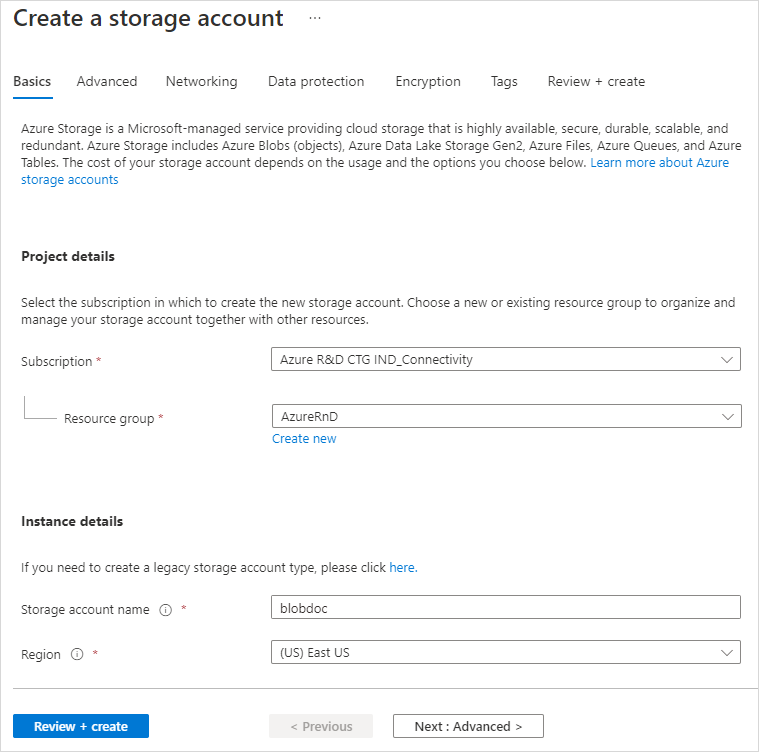
Step 3: Basic Configuration
You will now enter the basic details required to set up the storage account.
- Subscription – Select the subscription under which this account will be created.
- Resource Group – Either choose an existing resource group or create a new one. Resource groups help organize your Azure resources.
- Storage Account Name – Provide a globally unique name. It must be between 3 and 24 characters and can include numbers and lowercase letters only.
- Region – Choose the Azure region closest to your users or services to reduce latency and increase redundancy.
- Performance – Select either:
- Standard – Best for general-purpose storage (blobs, tables, queues, and files).
- Premium – Optimized for low latency and high performance (ideal for intensive workloads like databases).
Step 4: Advanced Configuration
In the advanced tab, configure the following:
- Replication – Choose a replication strategy based on your redundancy and durability needs:
- LRS (Locally Redundant Storage) – Data is replicated three times within a single datacenter.
- ZRS (Zone-Redundant Storage) – Data is replicated across availability zones.
- GRS (Geo-Redundant Storage) – Data is replicated to another region, ensuring disaster recovery.
RA-GRS (Read-Access Geo-Redundant Storage) – Similar to GRS but allows read access to the secondary region.
- Access Tier – Select either:
- Hot – For frequently accessed data.
- Cool – For infrequently accessed data with lower storage costs.
- Archive – For rarely accessed data, providing the lowest storage cost.
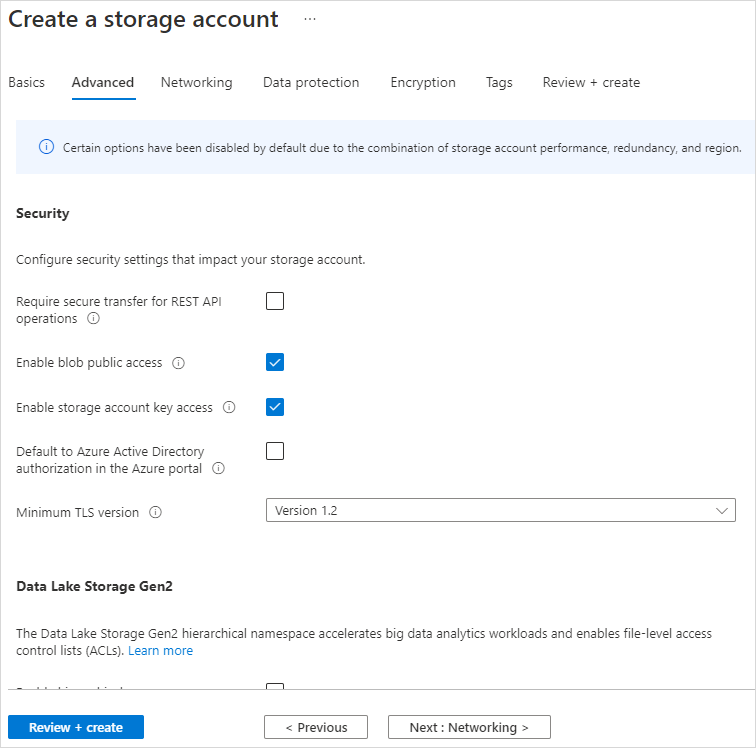
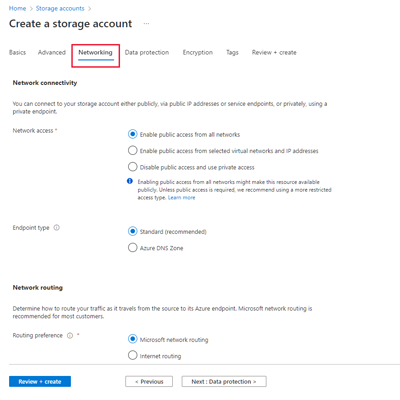
Step 5: Security and Networking
Configure how your storage account can be accessed:
- Networking – Configure private endpoints or restrict access via selected virtual networks.
- Data Protection – Enable soft delete for blobs, files, or containers to recover deleted data.
- Encryption – By default, Azure encrypts data at rest using Microsoft-managed keys. You can choose to manage your own keys through Azure Key Vault.
Step 6: Review and Create
Review the configured settings.
- If all the information is correct, click Review + Create.
- After validation, click Create to deploy your Azure Storage Account.
Best Practices
- Enable Encryption
- Ensure encryption is enabled for data at rest and in transit to secure sensitive information.
- Use Private Endpoints
- Restrict storage account access to trusted virtual networks using private endpoints.
- Implement Firewalls and NSGs
- Apply firewalls to block untrusted IP addresses and use NSGs to control traffic.
- Monitor and Automate
- Use Azure Monitor to track usage and performance. Automate routine tasks using Azure Functions or Logic Apps.
- Replication for Disaster Recovery
- Choose replication strategies like GRS or RA-GRS to ensure your data is available even during regional outages
Connecting Storage Accounts to Applications
Once the storage account is created, you can connect it to various services:
- Blob Storage – Upload files through the Azure portal, Azure CLI, or SDKs.
- File Shares – Mount file shares to VMs or on-premises machines.
- Table and Queue Storage – Integrate with serverless apps or microservices for data management and message queuing.
Troubleshooting Common Issues
- Storage Account Name Error – Ensure the name is unique and follows Azure naming conventions.
- Deployment Failure – Verify that the selected region supports your chosen performance and redundancy options.
- Access Denied – Check firewall rules, private endpoint configurations, and IAM roles.
Conclusion
Creating a storage account in Azure is essential for building scalable, secure, and high-performing applications. By following this guide, you can effectively deploy and manage Azure Storage Accounts, ensuring that your data is stored, managed, and accessed efficiently.
For more information reffer Azure Storage Documentation