
How to Create a Virtual Machine in Azure: Step-by-Step Guide
Introduction to Azure Virtual Machines
Microsoft Azure provides cloud-based virtual machines (VMs) that allow you to run applications and services without needing on-premise hardware.
Azure VMs are highly scalable, secure, and customizable to meet various computing needs, from development to large-scale deployments.
In this guide, we’ll walk you through the step-by-step process of creating a virtual machine in Azure, ensuring you can quickly deploy and manage your workloads in the cloud.
Benefits of Creating Virtual Machines in Azure
- Scalability: Easily scale up or down based on demand.
- Cost-Efficiency: Pay only for the resources you use, reducing overhead costs.
- Flexibility: Deploy Windows or Linux VMs with various configurations.
- Security: Built-in encryption, network security groups, and compliance standards.
- Global Reach: Deploy VMs in multiple regions to improve availability and reduce latency.
Prerequisites for Creating an Azure Virtual Machine
Before creating a virtual machine, ensure you have the following:
- An active Azure account.
- Access to the Azure portal or Azure CLI.
- Permission to create resources in a specific subscription or resource group.
Step-by-Step: How to create a linux virtual machine in azure
Step 1: Log in to the Azure Portal
- Open your web browser and go to the Azure portal.
- Log in using your Azure account credentials.
Step 2: Navigate to Virtual Machines
- In the Azure portal, search for Virtual Machines in the top search bar or select it from the left-hand menu.
- Click Create and then choose Azure Virtual Machine.
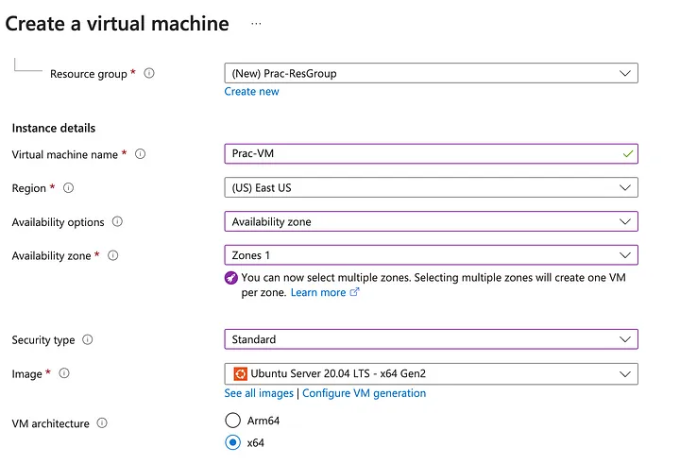
Step 3: Configure the Basics
- Under the Basics tab, fill in the following details:
- Subscription: Select your Azure subscription.
- Resource Group: Choose an existing resource group or create a new one.
- Virtual Machine Name: Enter a name for your VM (e.g.,
MyAzureVM). - Region: Select the region where you want to deploy the VM.
- Image: Choose an operating system (e.g., Ubuntu, Windows Server).
- Size: Select the VM size based on your workload requirements.
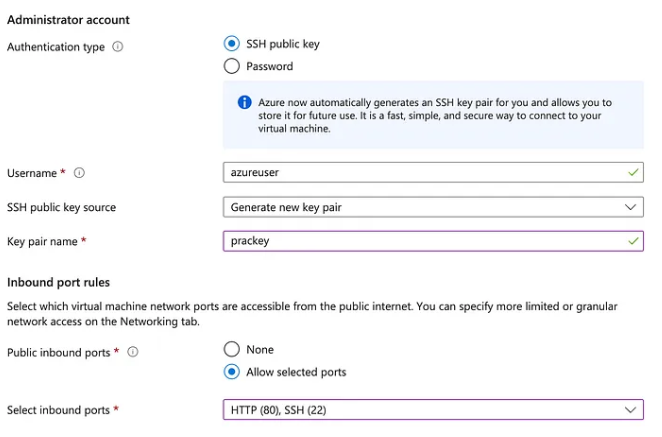
Step 4: Configure Administrator Account
- For Windows VMs, provide an administrator username and password.
- For Linux VMs, provide a username and either SSH public key or password authentication.
Step 5: Configure Disks
- Under the Disks tab, choose the OS disk type (Standard SSD, Premium SSD, or HDD).
- Add any data disks if necessary.
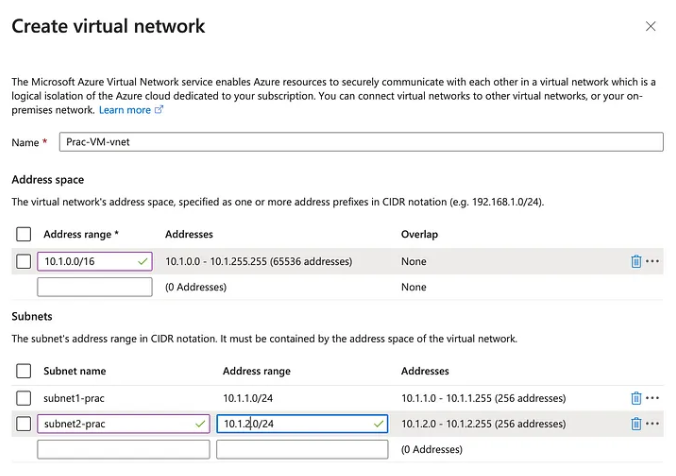
Step 6: Networking
- In the Networking tab, configure the virtual network (VNet) and subnet.
- Enable public IP if external access is required.
- Set up inbound port rules (e.g., allow RDP for Windows or SSH for Linux).
Step 7: Management and Monitoring
- Enable Boot Diagnostics to troubleshoot startup issues.
- Enable Monitoring to track VM performance.
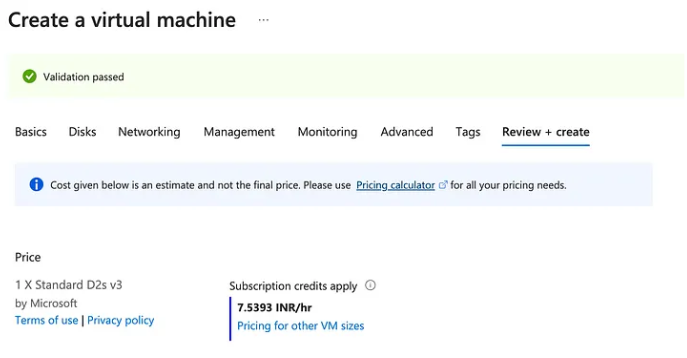
Step 8: Review and Create
- Review the configuration under the Review + Create tab.
- Ensure all configurations are correct and click Create to deploy the VM.
Connect to Your Azure Virtual Machine
- For Windows VMs: Download the RDP file and connect using Remote Desktop.
- For Linux VMs: Use SSH:
ssh username@public-ip-address
How to create a virtual machine in azure cli
To create a virtual machine (VM) in Azure using the Azure CLI, follow these steps:
Prerequisites:
- Azure CLI installed. If not, install it from here.
- Azure account with appropriate permissions to create a VM (e.g., Owner, Contributor).
- A resource group and virtual network should exist or be created during the VM setup.
Steps to Create a Virtual Machine in Azure using Azure CLI:
Step 1: Login to Azure
First, log in to your Azure account:
az login
This will prompt you to authenticate with your Azure credentials.
Step 2: Create a Resource Group (if not already created)
If you don’t already have a resource group, create one:
az group create --name MyResourceGroup --location eastus
Replace MyResourceGroup with your preferred resource group name and eastus with the desired region.
Step 3: Create a Virtual Network and Subnet (Optional)
You can create a virtual network and subnet for your VM (if you don’t already have one):
az network vnet create --resource-group MyResourceGroup --name MyVNet --subnet-name MySubnet
This creates a virtual network MyVNet with a subnet MySubnet in the MyResourceGroup resource group.
Step 4: Create a Public IP Address (Optional)
If you want your VM to have a public IP address (useful for SSH or RDP access), create one:
az network public-ip create --resource-group MyResourceGroup --name MyPublicIP
Step 5: Create a Network Interface Card (NIC)
Create a NIC and attach it to the virtual network and public IP (if desired):
az network nic create --resource-group MyResourceGroup --name MyNIC --vnet-name MyVNet --subnet MySubnet --public-ip-address MyPublicIP
Step 6: Create the Virtual Machine
Now, create the VM using the following command:
az vm create \
  --resource-group MyResourceGroup \
  --name MyVM \
  --image UbuntuLTS \
  --size Standard_B1s \
  --admin-username azureuser \
  --generate-ssh-keys \
  --nics MyNIC
Explanation of parameters:
--resource-group MyResourceGroup: The resource group where the VM will be created.--name MyVM: Name of the virtual machine.--image UbuntuLTS: The operating system image (you can change this to other images likeWindowsServer).--size Standard_B1s: The VM size (you can adjust this based on your requirements).--admin-username azureuser: The admin username for the VM.--generate-ssh-keys: Automatically generate SSH keys if you don’t have them.--nics MyNIC: The network interface card to associate with the VM.
You can replace the --image with other operating system images (e.g., WindowsServer for Windows VMs) depending on your needs.
Step 7: Open Required Ports
If you need to open ports (e.g., SSH on port 22 for Linux or RDP on port 3389 for Windows), you can create a network security group (NSG) rule:
az vm open-port --resource-group MyResourceGroup --name MyVM --port 22 --priority 1000
For Windows, replace 22 with 3389 to enable RDP access.
Step 8: Access the Virtual Machine
- For Linux VMs, you can SSH into the VM:
ssh azureuser@<public-ip-address>Replace
<public-ip-address>with the public IP of the VM. - For Windows VMs, you can use RDP (Remote Desktop Protocol) to connect using the public IP.
Step 9: Verify VM Creation
To check if the VM was created successfully, use the following command:
az vm show --resource-group MyResourceGroup --name MyVM --output table
This will display details about the VM, including its public IP, state, and other information.
Step 10: Stop and Delete the VM (Optional)
If you no longer need the VM, you can stop and delete it to save costs:
To stop the VM:
az vm stop --resource-group MyResourceGroup --name MyVM
To delete the VM (along with the NIC and public IP):
az vm delete --resource-group MyResourceGroup --name MyVM --yes
az network nic delete --resource-group MyResourceGroup --name MyNIC
az network public-ip delete --resource-group MyResourceGroup --name MyPublicIP
Best Practices for Azure Virtual Machines
- Use Tags: Organize and manage resources by adding tags.
- Enable Auto Shutdown: Save costs by setting auto-shutdown during non-working hours.
- Implement Security Groups: Restrict access to VMs with Network Security Groups (NSG).
- Backup VMs: Use Azure Backup to protect against data loss.
- Resize as Needed: Adjust VM size based on performance requirements.
Common Issues and Troubleshooting
- VM Fails to Deploy: Check your subscription limits or try another region.
- Unable to Connect via RDP/SSH: Ensure port 22 (Linux) or port 3389 (Windows) is open.
- Performance Issues: Resize the VM or add more resources as needed.
Why Use Virtual Machines in Azure?
Azure VMs are one of the most versatile and powerful tools in cloud computing. Here’s why businesses and developers choose Azure VMs:
- Flexibility: Choose from a wide range of VM sizes, operating systems, and configurations to meet your project’s needs.
- Scalability: Easily scale your VM up or down based on usage, ensuring cost-efficiency and performance optimization.
- Security: Azure offers robust security, including encrypted disks, firewalls, and network isolation through virtual networks (VNets).
- Disaster Recovery: Create snapshots and backups to ensure data is protected and easily recoverable.
- Cost Savings: With pay-as-you-go pricing and reserved instances, you can manage costs effectively and only pay for what you use.
Use Cases for Azure Virtual Machines:
- Application Hosting: Run web applications, databases, and APIs.
- Development and Testing: Quickly spin up test environments.
- Backup and Disaster Recovery: Deploy secondary VMs to ensure availability.
- Big Data and Analytics: Process large datasets with high-powered VM configurations.
- Gaming and Media: Host multiplayer servers or render media files
Conclusion
Creating virtual machines in Azure is a simple yet powerful process, allowing businesses to harness the scalability and flexibility of the cloud.
By following this guide, you can deploy and manage VMs efficiently, taking full advantage of Azure’s capabilities.
For more details, visit the Azure Virtual Machine Documentation.
Learn More: Azure Cost Optimization