
How to Create Public Load Balancer in Azure
Introduction
Azure Load Balancer is a highly available and scalable service that distributes incoming traffic across multiple virtual machines. It plays a critical role in ensuring high availability and reliability for your applications. This guide will walk you through the process of configuring a load balancer in Azure, highlighting best practices and essential configurations.
Key Features of Azure Load Balancer
1. Layer 4 Load Balancing (Transport Layer)
- Operates at Layer 4 of the OSI model, supporting TCP and UDP traffic. It efficiently distributes incoming traffic based on IP address and port without inspecting packet contents.
2. Public and Internal Load Balancing
- Public Load Balancer – Distributes incoming internet traffic to virtual machines inside a virtual network.
- Internal Load Balancer – Manages traffic among virtual machines within the same virtual network, useful for private applications and backend services.
3. High Availability and Fault Tolerance
- Distributes traffic across healthy backend virtual machines, ensuring services remain available even if individual VMs or zones experience issues.
4. Health Probes
- Continuously monitors the health of virtual machines in the backend pool. If a VM becomes unhealthy, the load balancer stops sending traffic to it until it recovers.
5. Zone Redundancy
- Supports zone-redundant configurations, ensuring traffic distribution across availability zones within a region. This enhances fault tolerance and minimizes the risk of zone failures.
6. Scalability
- Automatically scales to handle increased traffic by distributing it across multiple virtual machines, making it ideal for applications with fluctuating demand.
7. Outbound Connections (NAT Gateway Integration)
- Manages outbound connections for virtual machines by assigning public IP addresses through Network Address Translation (NAT). This eliminates the need for individual VM public IPs.
8. Session Persistence (Sticky Sessions)
- Provides options for maintaining session persistence, ensuring requests from the same client are routed to the same backend instance for the duration of a session.
9. Floating IP (Direct Server Return)
- Enables the use of Floating IP for direct traffic return to clients, reducing latency by bypassing the load balancer for response traffic.
10. Inbound and Outbound Rules
- Customize traffic distribution with inbound and outbound rules to control how traffic flows to and from backend VMs.
11. Multi-Protocol Support
- Supports multiple protocols including TCP, UDP, and HTTP, providing flexibility for a wide range of applications, from web services to gaming and streaming platforms.
12. Integration with Azure Services
- Integrates seamlessly with Azure Virtual Machines, Virtual Machine Scale Sets (VMSS), Azure Kubernetes Service (AKS), and other Azure services to manage and distribute traffic across various environments.
13. Logging and Monitoring
- Provides extensive logging and diagnostic tools through Azure Monitor, enabling performance tracking, traffic analysis, and troubleshooting.
14. IPv6 and IPv4 Support
- Supports both IPv4 and IPv6 traffic, allowing organizations to future-proof their networking configurations and meet modern IP addressing standards.
15. Secure by Design
- Built on Microsoft’s trusted cloud infrastructure, ensuring secure traffic management with options to restrict traffic through Network Security Groups (NSGs) and firewalls.
16. Cost-Effective
- Azure Load Balancer is cost-efficient and often included in Azure’s native services, making it more affordable compared to third-party solutions.
Prerequisites
- An active Azure subscription
- Virtual machines or backend resources to distribute traffic
- Basic understanding of Azure networking concepts
- Access to the Azure portal
How to Create Public Load Balancer in Azure
Log in to Azure Portal
Head over to the Azure Portal and sign in using your credentials.
Create a Virtual Network and Bastion Host
- In the Azure portal, search for Virtual Networks in the top search bar.
- Select + Create to begin setting up a new virtual network.
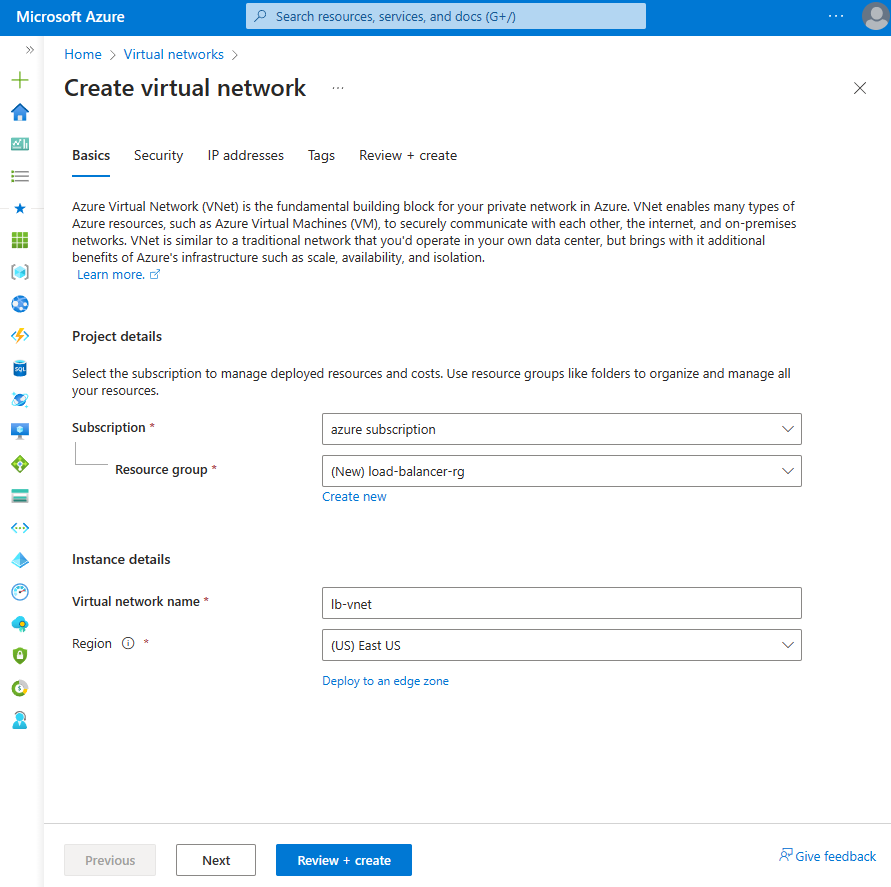
Basics Tab:
- Subscription – Select your Azure subscription.
- Resource Group – Select Create new and name it load-balancer-rg.
- Name – Enter lb-vnet.
- Region – Choose East US or your preferred region.
- Click on the Security tab or select Next at the bottom.
Security Tab:
- Enable Azure Bastion – Check the box to enable Azure Bastion.
- Azure Bastion Host Name – Enter lb-bastion.
- Azure Bastion Public IP – Select Create new and name it lb-bastion-ip.
- Click OK.
IP Address Tab:
- IPv4 Address Space – Enter 10.0.0.0/16.
- Subnets – Click on the default subnet link to edit.
- Subnet Name – Enter backend-subnet.
- Starting Address – Enter 10.0.0.0.
- Subnet Size – Enter /24.
- NAT Gateway – Associate with the NAT gateway created later.
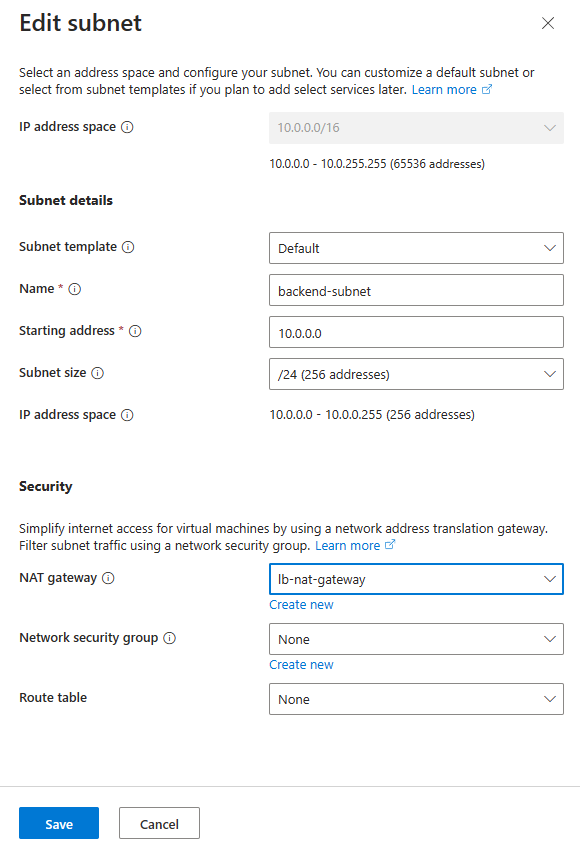
- Click Save and then Review + Create. After validation, click Create.
Create NAT Gateway
- In the Azure portal, search for NAT Gateway.
- Select + Create.
Basics Tab:
- Subscription – Select your subscription.
- Resource Group – Choose load-balancer-rg.
- NAT Gateway Name – Enter lb-nat-gateway.
- Region – Select East US.
- Availability Zone – Select No Zone.
- Idle Timeout – Enter 15 minutes.
- Click Next: Outbound IP.
- Select Create new public IP and name it nat-gw-public-ip. Click OK.
- Click Review + Create and then Create.
Create a Public Load Balancer
- In the portal, search for Load Balancer and select + Create.
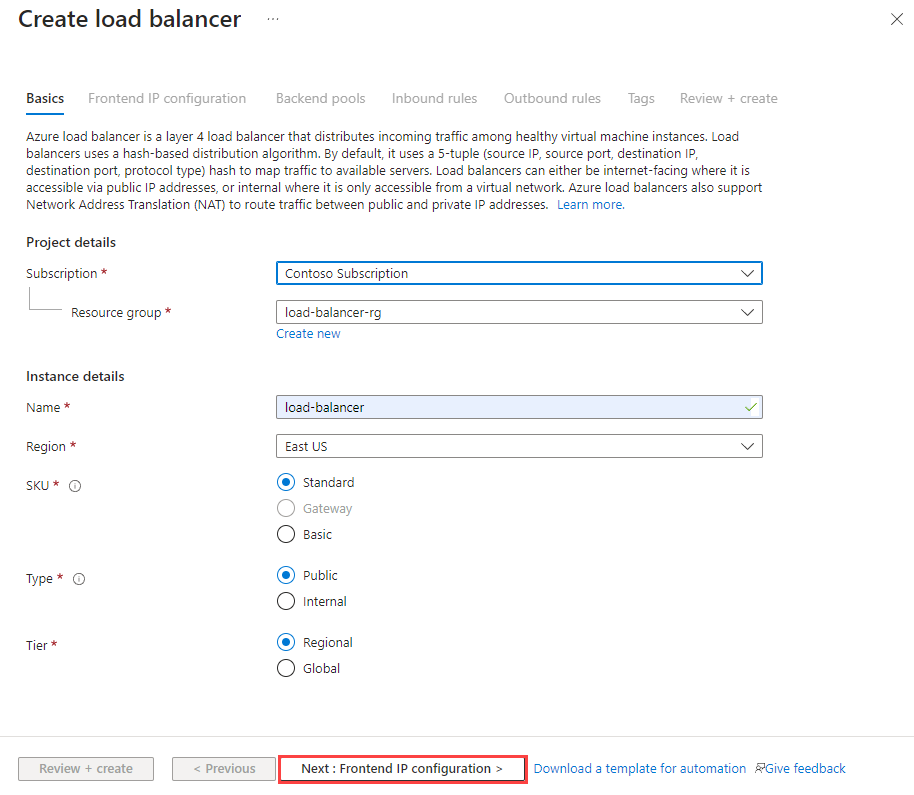
Basics Tab:
- Subscription – Choose your subscription.
- Resource Group – Select load-balancer-rg.
- Name – Enter load-balancer.
- Region – Select East US.
- SKU – Leave as Standard.
- Type – Select Public.
- Tier – Choose Regional.
Configure the Frontend IP
In the Frontend IP configuration section, click Add and specify the following:
-
- Name: Enter a name for the frontend IP.
- IP Version: IPv4 or IPv6.
- IP Address: Create a new public IP or select an existing one.
Configure the Backend Pool
-
- In the Backend Pool tab, click + Add a backend pool.
- Enter lb-backend-pool as the name.
- Select lb-vnet as the virtual network.
- Choose IP Address for the backend pool configuration.
- Click Save.
Set Up Load Balancing Rules
- In the Inbound Rules tab, click + Add a Load Balancing Rule.
Load Balancing Rule:
- Name – Enter lb-HTTP-rule.
- IP Version – Select IPv4.
- Frontend IP – Choose lb-frontend.
- Backend Pool – Select lb-backend-pool.
- Protocol – Choose TCP.
- Port – Enter 80.
- Backend Port – Enter 80.
- Health Probe – Select Create new and name it lb-health-probe.
- Select HTTP for protocol and leave the default settings. Click Save.
- Click Review + Create and then Create.
Create Virtual Machines
- In the portal, search for Virtual Machines and select + Create.
Basics Tab:
- Subscription – Select your subscription.
- Resource Group – Choose load-balancer-rg.
- VM Name – Enter lb-VM1.
- Region – Select East US.
- Availability Zone – Select Zone 1.
- Create a second VM with the same settings but place it in Zone 2.
- Add the VMs to the lb-backend-pool during the networking configuration.
Benefits and Advantages of Azure Load Balancer
1. High Availability and Redundancy
- Azure Load Balancer ensures that traffic is distributed across multiple virtual machines, preventing a single point of failure. If one VM becomes unhealthy, traffic is redirected to other healthy instances, ensuring application uptime.
2. Scalability
- Easily scale applications by adding more virtual machines to the backend pool. Azure Load Balancer dynamically adjusts to handle increased traffic loads, making it suitable for applications with fluctuating demand.
3. Cost-Effective
- Azure Load Balancer is a native service included with Azure subscriptions at a low cost compared to third-party load balancing solutions. There are no additional infrastructure requirements.
4. Flexibility
- Supports both public and internal traffic distribution, making it suitable for external-facing web applications as well as internal services. The ability to configure both TCP and UDP traffic handling broadens its use cases.
5. Automatic Failover
- With health probes continuously monitoring the status of backend VMs, the load balancer can automatically route traffic away from unhealthy instances, improving system resilience and reducing downtime.
6. Zone Redundancy
- When deployed with availability zones, Azure Load Balancer can distribute traffic across zones, protecting against zone-level failures and enhancing disaster recovery capabilities.
7. Integration with Azure Services
- Azure Load Balancer integrates seamlessly with Azure Virtual Machines, Virtual Machine Scale Sets, and Azure Kubernetes Service (AKS). This allows for comprehensive traffic management across a variety of Azure deployments.
8. Enhanced Performance
- Load balancing ensures that no single VM is overloaded, optimizing response times and improving the overall performance of the application.
Disadvantages of Azure Load Balancer
1. Limited to Layer 4 (Transport Layer)
- Azure Load Balancer operates at Layer 4 (TCP/UDP), meaning it cannot perform advanced traffic routing decisions based on HTTP headers, cookies, or SSL termination. For Layer 7 (Application Layer) load balancing, Azure Application Gateway is required.
2. Complex Initial Setup
- While straightforward for simple deployments, more complex configurations involving NAT gateways, multiple subnets, and bastion hosts can be challenging for beginners. A thorough understanding of Azure networking is essential.
3. Dependency on Other Azure Services
- To achieve outbound connectivity, NAT Gateway or public IP configurations are often required. This can add to the complexity and cost, especially for smaller projects.
4. Limited Customization
- Compared to third-party load balancers like F5 or NGINX, Azure Load Balancer offers fewer customization options for traffic manipulation and inspection. Advanced traffic control features may require additional Azure services.
5. Potential Latency
- In high-traffic scenarios, there can be slight latency when routing traffic between availability zones or across different regions. While generally minimal, this could impact latency-sensitive applications.
6. Regional Limitation
- Azure Load Balancer operates within a single region. For cross-region traffic distribution, additional services like Azure Traffic Manager are necessary.
Use Cases for Azure Load Balancer
- Web Applications – Distribute web traffic across multiple VMs for a seamless user experience.
- API Hosting – Balance API requests to ensure reliability and uptime for critical services.
- Internal Services – Manage internal application traffic between microservices or distributed applications.
- Gaming and Media – Load balance UDP traffic for gaming servers or media streaming platforms.
- Hybrid Applications – Ensure continuity for hybrid applications that rely on on-premises and cloud resources
Conclusion
Configuring an Azure Load Balancer is essential for ensuring high availability, scalability, and resilience for your applications and services. By distributing incoming traffic across multiple virtual machines, the load balancer prevents single points of failure, optimizes resource utilization, and enhances performance. This guide walked you through the complete process of setting up a load balancer, from creating virtual networks and bastion hosts to deploying NAT gateways and virtual machines.
The addition of health probes, backend pools, and load-balancing rules ensures that traffic is directed only to healthy instances, improving overall system reliability. By incorporating security measures, such as Azure Bastion and custom network security groups (NSGs), your environment remains protected against potential threats while providing seamless access for management and operations.
By following best practices—such as deploying VMs across availability zones and enabling logging—you can ensure robust, fault-tolerant architectures that withstand regional outages and heavy traffic loads. Testing the load balancer by simulating VM failures and observing traffic distribution further guarantees system resilience.
Azure Load Balancer is a cornerstone of modern cloud deployments, and mastering its configuration empowers organizations to build scalable, performant, and reliable applications in the cloud. Whether for web applications, databases, or API endpoints, the flexibility of Azure Load Balancer ensures that your infrastructure meets the demands of a dynamic, ever-evolving digital landscape.