

Create Custom Role in Azure
Introduction
Azure Role-Based Access Control (RBAC) is an essential tool for managing access to Azure resources. While Azure provides built-in roles to cover common scenarios, there are situations where predefined roles don’t meet specific requirements. In such cases, creating a custom role is necessary.
Custom roles allow you to define granular permissions tailored to your organizational needs, ensuring users or groups have the exact level of access required—no more, no less. This guide provides a detailed walkthrough of creating and managing custom roles in Azure, covering best practices, step-by-step instructions, and troubleshooting tips.
Why Create Custom Roles in Azure?
While Azure’s built-in roles cover a wide range of scenarios, custom roles provide flexibility when:
- Granular Permissions are Required – Built-in roles may grant too much or too little access.
- Specific Resource-Level Control – You need to restrict or extend access to specific resources or actions.
- Compliance Requirements – Custom roles help ensure that permissions align with security and compliance mandates.
- Operational Efficiency – Assign the minimum necessary permissions, reducing the risk of accidental or malicious activities.
Key Concepts of Azure RBAC
- Role – Defines a collection of permissions.
- Scope – The level at which a role is applied (subscription, resource group, resource).
- Assignment – Assigns a role to a user, group, or service principal.
- Action – Defines what actions are allowed (e.g.,
Microsoft.Compute/*/read). - NotAction – Excludes specific permissions from a role.
Prerequisites
Before creating a custom role, ensure you have the following:
-
- Azure Subscription – A valid Azure subscription is required.
- Azure AD Permissions – Global Administrator, Owner, or User Access Administrator roles.
- Azure CLI or PowerShell – Custom roles can be created through the portal, Azure CLI, or PowerShell.
- Understanding of RBAC – Familiarity with built-in Azure roles and RBAC concepts.
How to create custom role in azure
Define the Role Requirements
- List the actions and resources that the custom role should have access to.
- Identify the built-in role that closely matches the permissions you need.
- Determine the scope of the custom role (subscription, resource group, or individual resource).
-
Step 1: Log in to Azure Portal
Visit the Azure Portal and sign in with your credentials.
-
Step 2: Navigate to Subscriptions
From the Azure homepage, click on Subscriptions in the left-hand menu. Select the subscription where you plan to create the custom role.
-
Step 3: Access Control (IAM)
In the subscription menu, click on Access Control (IAM). Choose the Roles tab and click + Add followed by Add Custom Role.
-
Step 4: Configure the Custom Role
Provide the following details:
- Role Name: Enter a unique and descriptive name.
- Description: Briefly explain the purpose of the role.
- Baseline Permissions: Choose to start from scratch or clone an existing role.
-
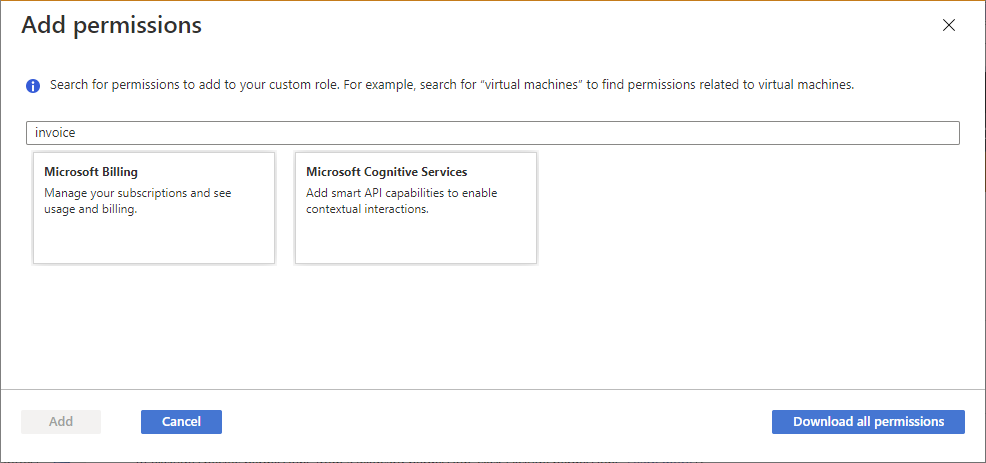
Step 5: Define Permissions
- In the Permissions tab, click + Add Permissions.
- Select the appropriate actions to allow (e.g.,
Microsoft.Storage/*/read). - Use the NotActions section to explicitly deny permissions (e.g.,
Microsoft.Compute/virtualMachines/delete). - Review and organize actions carefully to ensure the role meets your security policies.
 Step 6: Set Scope
Choose the scope at which this role can be applied:
-
- Subscription – Broadest level, affects all resources within the subscription.
- Resource Group – Limits the role to resources within a specific resource group.
- Resource – Granular level, applying permissions to a single resource
Step 7: Review and Deploy
-
- Review the custom role configuration.
- Click Create to finalize the role.
- Once created, assign the custom role to users, groups, or service principals by navigating to Access Control (IAM) and selecting + Add Role Assignment.
Custom role example
Creating Custom Role via Azure CLI
If you prefer the command line, use Azure CLI to create a custom role:
- Export an Existing Role
- Modify the Role
- Open the
reader-role.jsonfile and adjust theActionsandNotActionsfields. - Change the
nameandidvalues to reflect a new role.
- Deploy the Custom Role
Custom role properties
Here are the key properties of a custom role in Azure Role-Based Access Control (RBAC):
1. Name
- Description: A unique, descriptive name for the custom role.
- Example:
"Virtual Machine Operator"
2. Id
- Description: A unique identifier (GUID) for the custom role. This is typically generated during role creation.
- Example:
"88888888-8888-8888-8888-888888888888"
3. IsCustom
- Description: Indicates whether the role is custom or built-in.
- Values:
true– The role is custom.false– The role is built-in.
- Example:
true
4. Description
- Description: A brief summary describing the role’s purpose and what it can do.
- Example:
"Can monitor and restart virtual machines."
5. Actions
- Description: A list of permitted actions that define what operations the role can perform.
- Format:
- Resource provider and action (wildcards
*are allowed).
- Resource provider and action (wildcards
- Example:
6. NotActions
- Description: A list of denied actions that the role explicitly cannot perform.
- Example:
If left empty, all actions listed in
Actionsare allowed.
7. DataActions
- Description: Specifies actions on data within a resource (e.g., reading blob data). Primarily used for data-level access.
- Example:
8. NotDataActions
- Description: Denies specific data-level actions.
- Example:
9. AssignableScopes
- Description: Defines the scopes where this role can be assigned. This could be at the subscription, resource group, or management group level.
- Format:
10. Examples of AssignableScopes
- Subscription Level:
/subscriptions/{subscriptionId} - Resource Group Level:
/subscriptions/{subscriptionId}/resourceGroups/{resourceGroupName} - Management Group Level:
/providers/Microsoft.Management/managementGroups/{managementGroupId}
create custom role in azure using powershell
Creating a custom role in Azure using PowerShell involves defining the permissions and setting up the custom role using the Azure PowerShell cmdlets. Here’s a step-by-step guide:
Prerequisites:
- Azure PowerShell installed (Use
Install-Module -Name Az -AllowClobber -Force -Scope CurrentUserif not installed). - Azure account with sufficient privileges (e.g., Owner or User Access Administrator).
Step 1: Login to Azure
First, you need to log in to your Azure account.
Connect-AzAccount
Step 2: Define the Custom Role JSON
To create a custom role, you need to define the permissions it will have in a JSON file. The JSON structure includes Name, Description, and a list of Actions (permissions).
Here’s an example JSON for a custom role:
{
  "Name": "Custom VM Reader",
  "Description": "Can view virtual machines and related resources",
  "Actions": [
    "Microsoft.Compute/virtualMachines/read",
    "Microsoft.Compute/virtualMachines/instanceView/read",
    "Microsoft.Network/networkInterfaces/read",
    "Microsoft.Network/publicIPAddresses/read"
  ],
  "NotActions": [],
  "AssignableScopes": [
    "/subscriptions/{subscriptionId}/resourceGroups/{resourceGroupName}"
  ]
}
You can save this JSON structure to a file (e.g., custom-role.json).
Step 3: Create the Custom Role Using PowerShell
Now, you will use PowerShell to create the custom role. The New-AzRoleDefinition cmdlet is used to create custom roles.
# Path to the custom role definition file
$roleDefinition = Get-Content -Raw -Path "C:\path\to\custom-role.json" | ConvertFrom-Json

# Create the custom role
New-AzRoleDefinition -InputObject $roleDefinition
Replace "C:\path\to\custom-role.json" with the path to your JSON file.
Step 4: Assign the Custom Role
Once the custom role is created, you can assign it to a user, group, or service principal.
To assign the custom role to a user, use the following PowerShell command:
# Assign the custom role to a user
New-AzRoleAssignment -ObjectId "<UserObjectId>" -RoleDefinitionName "Custom VM Reader" -Scope "/subscriptions/{subscriptionId}/resourceGroups/{resourceGroupName}"
Replace:
<UserObjectId>with the Object ID of the user or group.{subscriptionId}with your Azure Subscription ID.{resourceGroupName}with the resource group where you want to assign the role.
To get the ObjectId of a user:
Get-AzADUser -UserPrincipalName "[email protected]"
Step 5: Verify the Custom Role
You can list and verify your custom role using the Get-AzRoleDefinition cmdlet:
Get-AzRoleDefinition | Where-Object {$_.Name -eq "Custom VM Reader"}
Summary:
- Define the permissions in a JSON file.
- Create the custom role using
New-AzRoleDefinitioncmdlet. - Assign the custom role to users/groups via
New-AzRoleAssignment. - Verify the custom role with
Get-AzRoleDefinition.
This process will allow you to create and assign a custom Azure role using PowerShell.
Best Practices For Creating Custom Roles
- Follow the Principle of Least Privilege
- Assign only the permissions required for users to perform their tasks.
- Regularly Review Role Assignments
- Periodically audit custom roles to ensure they align with evolving security policies.
- Avoid Over-Permissive NotActions
- Ensure that NotActions don’t inadvertently block necessary permissions.
- Use Naming Conventions
- Clearly name custom roles to reflect their purpose, making management easier.
- Document Custom Roles
- Maintain records detailing the permissions, scope, and reason for creating each custom role.
Troubleshooting Common Issues
- Role Assignment Fails – Verify that the custom role is correctly scoped and that the user has the necessary permissions to assign roles.
- Permissions Not Working as Expected – Check for conflicting NotActions that may override allowed actions.
- Custom Role Not Visible – Refresh the portal or check if the role is created at the appropriate scope.
Conclusion
Creating custom roles in Azure is crucial for managing fine-grained access control over your resources. By following this guide, you can ensure that your custom roles align with organizational policies and security best practices. Custom roles allow for greater flexibility, helping you meet specific business and technical needs while minimizing risk through proper access control.
For more information refer below links