
🌐 Configure Azure VPN Point-to-Site
🌟 Introduction
Azure VPN Point-to-Site (P2S) configuration allows individual devices to securely connect to an Azure virtual network (VNet) over an encrypted VPN tunnel. This solution is ideal for remote workers, developers, and small teams who need secure access to resources in Azure from anywhere.
In this guide, we’ll walk you through the process of setting up a Point-to-Site VPN in Azure, explore its key features and benefits, and address common troubleshooting issues.
💡 What is Azure VPN Point-to-Site?
Azure Point-to-Site VPN is a type of virtual private network that allows a single device to establish a secure connection to an Azure VNet. Unlike a Site-to-Site VPN, which connects entire networks, P2S is designed for individual users or small teams.
Point-to-Site VPN is commonly used for:
- Remote Work: Securely access resources in Azure.
- Development and Testing: Allow developers to connect to Azure VNets from personal devices.
- Secure Access: Enable encrypted communication between users and cloud services.
✅ Key Features of Azure VPN Point-to-Site
- Secure Communication: Uses encrypted tunnels to protect data in transit.
- Protocol Support: Supports OpenVPN, SSTP, and IKEv2 protocols.
- Scalable: Easily scales to accommodate multiple users.
- Certificate-Based Authentication: Enhances security using certificates or Azure Active Directory (AAD).
- Multi-Device Support: Works on Windows, macOS, and Linux devices.
- Cost-Effective: Only pay for the resources used, without additional hardware requirements.
💡 Benefits of Configuring Azure VPN Point-to-Site
- Remote Access for Employees: Securely connects remote users to Azure VNets.
- No Hardware Requirements: No need for expensive VPN hardware; Azure handles it.
- Flexible Protocols: Choose from SSTP, IKEv2, or OpenVPN depending on your needs.
- Increased Security: Protects sensitive data with encryption and authentication options.
- Easy Scalability: Add or remove users as your needs evolve.
🛠️ How to Configure Azure VPN Point-to-Site
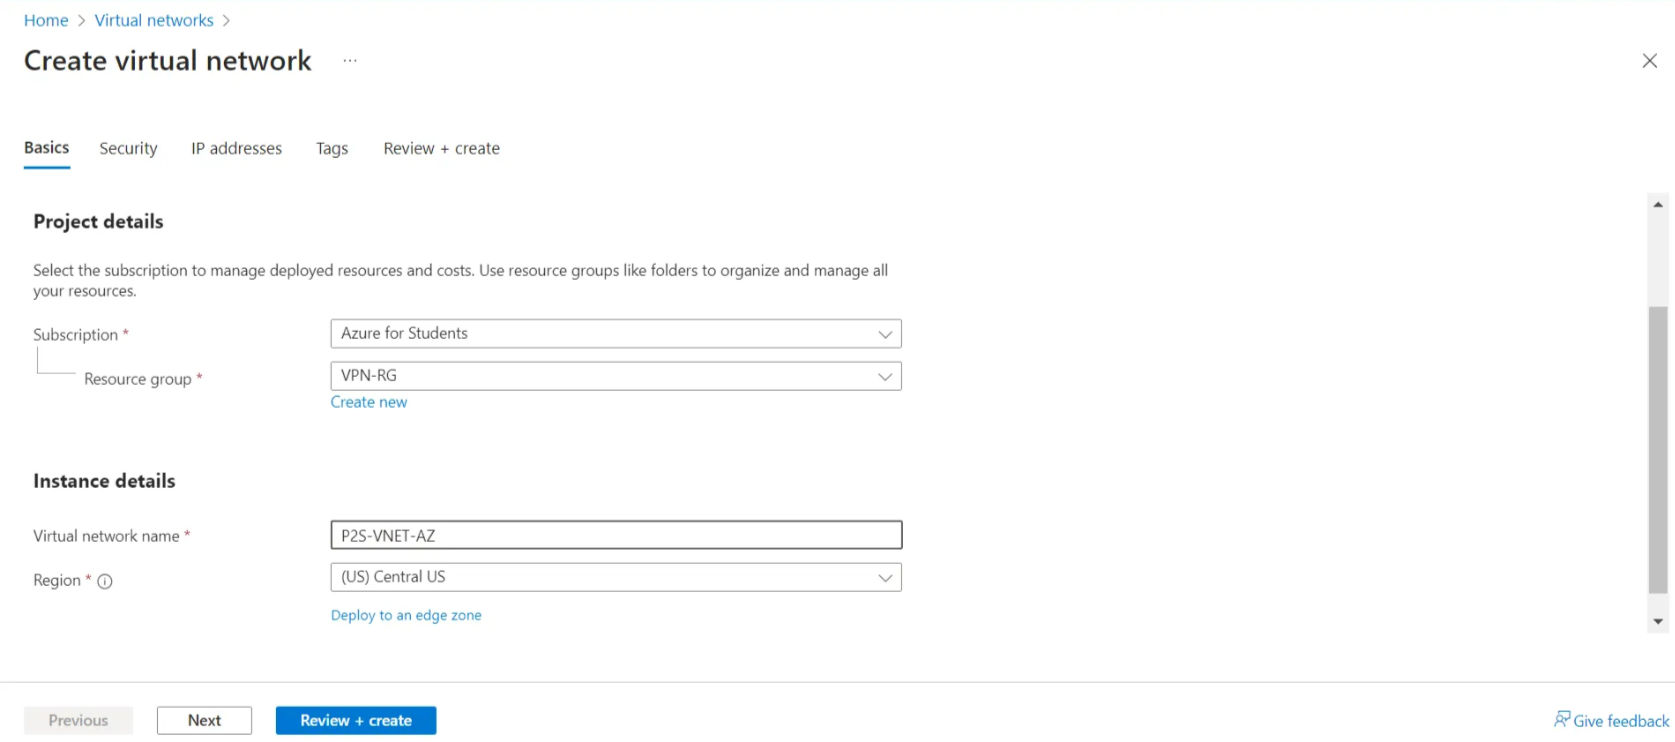
📌 Step 1: Create a Virtual Network (VNet)
- Log in to the Azure Portal.
- In the search bar, type “Virtual Networks” and click on it.
- Click + Create to set up a new virtual network:
- Name: Provide a name for your VNet (e.g.,
MyVPNVNet). - Address Space: Enter an IP address range (e.g.,
10.0.0.0/16). - Subnet: Add a subnet (e.g.,
10.0.1.0/24). - Region: Choose the region closest to your users.
- Name: Provide a name for your VNet (e.g.,
- Click Create.

📌 Step 2: Create a Virtual Network Gateway
-
Step 1: Create a Virtual Network (VNet)
- Log in to the Azure Portal.
- In the search bar, type “Virtual Networks” and click on it.
- Click + Create to create a new virtual network:
- Name: Provide a name for your VNet (e.g.,
MyVPNVNet). - Address Space: Enter the address space (e.g.,
10.0.0.0/16). - Subnets: Add at least one subnet (e.g.,
10.0.1.0/24). - Region: Select the region closest to your users.
- Name: Provide a name for your VNet (e.g.,
- Click Create to deploy the VNet.
Step 2: Create a Virtual Network Gateway
- In the Azure portal, search for “Virtual Network Gateway” and click on it.
- Click + Create to set up a new gateway:
- Name: Enter a name (e.g.,
MyVPNGateway). - Gateway Type: Choose VPN.
- VPN Type: Select Route-based.
- Virtual Network: Select the VNet you created earlier.
- Public IP Address: Create a new public IP address.
- Name: Enter a name (e.g.,
- Click Create to deploy the gateway. This process can take up to 30 minutes.
Step 3: Configure Point-to-Site Settings
- Once the gateway is deployed, go to the Virtual Network Gateway resource.
- Select Point-to-Site Configuration under the Settings menu.
- Click Configure Now and enter the following:
- Address Pool: Enter the address range for the VPN clients (e.g.,
172.16.0.0/24). - Tunnel Type: Choose supported protocols (e.g., OpenVPN, SSTP, or IKEv2).
- Authentication Type: Select one of the following:
- Azure Certificate: For certificate-based authentication.
- Azure Active Directory: For user-based authentication.
- Root Certificate: Upload your root certificate if using certificate-based authentication.
- Address Pool: Enter the address range for the VPN clients (e.g.,
- Click Save to apply the settings.


Step 4: Download the VPN Client
- After saving the Point-to-Site configuration, click VPN Client on the gateway page.
- Download the VPN client file based on your operating system (Windows, macOS, or Linux).
- Distribute the client file to users who need access.
Step 5: Connect to the VPN
- Install the downloaded VPN client on your device.
- Launch the client and enter your authentication credentials (if applicable).
- Connect to the VPN and verify access to the Azure VNet.
Other Methods to Configure Azure VPN Point-to-Site
- Azure CLI:
Automate the configuration using Azure CLI with commands like: - PowerShell:
Use PowerShell scripts for setting up the gateway and VPN client configurations:
Common Use Cases for Azure VPN Point-to-Site
- Remote Work Access: Allows remote employees to securely connect to the company’s Azure-based resources.
- Development and Testing: Developers can access isolated environments without exposing resources to the public.
- Hybrid Networking: Complement Site-to-Site VPNs by providing individual device connectivity.
Advantages of Azure VPN Point-to-Site
- Secure Connectivity: Ensures encrypted communication between client devices and Azure VNets.
- Flexible Deployment: No on-premises hardware is needed.
- Supports Multiple Protocols: Compatible with OpenVPN, SSTP, and IKEv2.
- Ease of Use: User-friendly configuration via the Azure portal.
Disadvantages of Azure VPN Point-to-Site
- Limited Client Connections: May not be ideal for large-scale user bases.
- Dependency on Internet Stability: Requires a stable internet connection for reliability.
- Manual Distribution: VPN client configurations must be distributed to individual users.
Best Practices for Azure VPN Point-to-Site
- Plan Address Pools Carefully: Avoid overlapping with existing VNets or on-premises address spaces.
- Use Multi-Factor Authentication: Enhance security by combining Azure AD with MFA.
- Monitor VPN Performance: Use Azure Monitor to track performance and troubleshoot issues.
- Automate Client Configurations: Use scripting tools to distribute and configure VPN clients.
Troubleshooting Common Issues
- Cannot Connect to VPN:
- Ensure that the VPN client address pool does not conflict with other subnets.
- Verify that the Virtual Network Gateway is correctly configured.
- Slow Connection Speeds:
- Check the user’s internet connection.
- Upgrade the Virtual Network Gateway SKU if necessary.
- Authentication Fails:
- Ensure that the root certificate is properly uploaded if using certificate-based authentication.
- Confirm user access permissions in Azure AD.
⚙️ Troubleshooting Common Issues
- Cannot Connect: Ensure the VPN client’s address pool does not overlap with the VNet’s address space.
- Slow Speeds: Verify internet stability and consider upgrading the Virtual Network Gateway SKU.
- Authentication Fails: Check the root certificate or user permissions in Azure Active Directory.
🎯 Conclusion
Azure VPN Point-to-Site is a powerful solution for enabling secure remote access to Azure VNets. By following the steps in this guide, you can quickly configure a P2S VPN connection and provide your team with secure, encrypted communication to your Azure resources.
Start configuring your Azure VPN today by logging into the Azure Portal. For more advanced configurations, check the official Azure documentation.