
Azure Cost Optimization
Introduction
Azure Virtual Machines (VMs) provide scalable and flexible compute resources in the cloud, enabling businesses to run workloads without the need for on-premises infrastructure. However, managing these VMs effectively is crucial to avoid overspending. By implementing cost-saving strategies, you can optimize your Azure VM expenses while maintaining performance and reliability.
In this article, we’ll explore practical tips and techniques to reduce costs associated with Azure Virtual Machines.
Tips for cost optimization in azure VMs
1. Use Azure Reserved Virtual Machines
If you know your VM workloads will run continuously for a long period (1 or 3 years), you can save significantly by committing to Azure Reserved Virtual Machines. By prepaying for VMs, you can reduce costs by up to 72% compared to pay-as-you-go pricing.
Steps to Reserve Virtual Machines:
- Log in to the Azure Portal.
- In the global search bar, search for Reservations.
- Select Resources for Reservation and choose Virtual Machines.
- Use filters to select the VMs you wish to reserve.
- Confirm and apply the reservation.

We can use Azure Pricing Calculator to estimate the prices of Virtual Machine.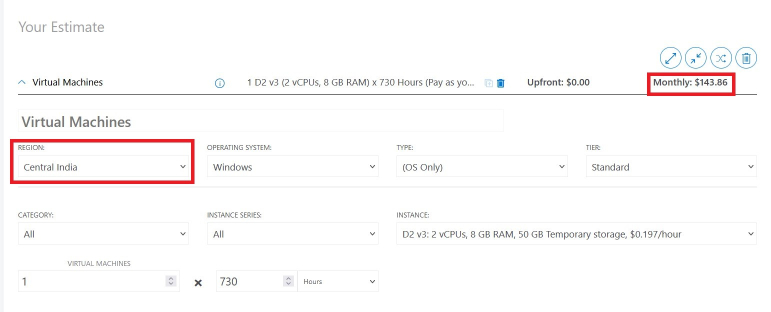
Tip: Use the Azure Pricing Calculator to estimate costs and savings before making a reservation.
2. Select the Right Azure Region for Azure Cost Optimization
The cost of Azure VMs varies by region. If your application does not require low latency or proximity to specific users, you can choose a low-cost region to save money. Compare prices for different regions using the Azure Pricing Calculator.
Example Cost Comparison (D2 v3, Windows Server, Per Hour):
- East US Region: $0.188/hour
- West US Region: $0.209/hour
- Central India Region: $0.197/hour
Note: Prices may vary depending on factors like currency exchange rates.
3. Leverage Azure Spot Virtual Machines
Azure Spot Virtual Machines allow you to use Azure’s unused compute capacity at significant cost savings—up to 90% compared to pay-as-you-go pricing. These VMs are ideal for workloads that can tolerate interruptions, such as:
- Development and testing environments
- Batch processing jobs
- Time-insensitive workloads
Key Considerations:
- Spot VMs can be evicted if Azure requires capacity for other workloads.
- Use them only for non-critical workloads that can handle disruptions.

4. Choose the Right VM Size
Azure offers a wide variety of VM sizes, each with different costs based on their compute and storage capabilities. To optimize costs:
- Regularly assess your VM requirements.
- Downsize VMs that are over-provisioned.
- Select the appropriate VM series based on your workload:
- B-Series (Burstable): Ideal for low-usage workloads.
- D-Series: Suitable for general-purpose workloads.
- F-Series: Optimized for compute-intensive workloads.
5. Enable Auto Shutdown for Unused VMs
If your VMs are used for development, testing, or other non-critical purposes, configure auto shutdown during off-hours to save costs.
How to Set Auto Shutdown:
- During VM creation, navigate to the Management tab.
- Scroll to the Auto-Shutdown section.
- Specify the time and days for auto shutdown (e.g., nights or weekends).
For existing VMs, use PowerShell scripts or Azure CLI to automate shutdown schedules.
6. Utilize Azure Hybrid Benefit
The Azure Hybrid Benefit allows you to use existing on-premises Windows Server or SQL Server licenses to reduce VM software licensing costs.
Savings:
- Up to 49% on VM costs for Windows Server.
- Applicable to both on-demand and reserved VMs.
How to Apply:
- During VM deployment, select Azure Hybrid Benefit under licensing options.
7. Use Azure Advisor for Recommendations
Azure Advisor is a free tool that analyzes your Azure usage and provides recommendations to optimize costs, improve performance, and enhance security.
Key Features:
- Cost Recommendations: Identify unused or underutilized resources.
- Alerts and Notifications: Set up alerts to receive recommendations.
- Best Practices: Get tailored advice based on your usage patterns.
8. Consolidate and Deallocate Resources
Tips:
- Deallocate Unused VMs: Stop VMs when they are not in use. Deallocated VMs do not incur compute charges.
- Consolidate Workloads: Combine smaller workloads onto fewer, larger VMs to reduce costs.
- Use Managed Disks: Switch to Azure Managed Disks for better performance and cost-efficiency.
9. Use VM Scale Sets
Azure Virtual Machine Scale Sets allow you to dynamically scale your VM instances based on demand. By scaling down during low usage periods, you can minimize costs while ensuring sufficient capacity during peak times.
Benefits:
- Automatic scaling based on CPU or memory usage.
- Integration with Azure Auto-Scaling policies.
10. Monitor and Analyze Costs
Use Azure’s built-in tools to monitor your expenses and identify cost-saving opportunities:
- Azure Cost Management + Billing: Track your spending and set budgets.
- Azure Monitor: Analyze VM performance and optimize resource allocation.
- Log Analytics: Gain insights into usage patterns and identify inefficiencies.
Azure storage cost optimization
Optimizing Azure Storage costs is crucial for managing your cloud expenses effectively. Here are key strategies to help reduce and optimize Azure Storage costs:
1. Choose the Right Storage Tier
Azure offers multiple storage tiers to accommodate different use cases. Choosing the correct tier can significantly reduce costs based on your data access patterns.
- Hot: For frequently accessed data. Higher cost but lower latency.
- Cool: For infrequently accessed data. Lower cost than Hot but higher than Archive.
- Archive: For rarely accessed data that can tolerate high latency. Cheapest option but with higher retrieval costs.
To change the tier, use this command:
az storage blob set-tier --container-name mycontainer --name myblob --tier Cool
2. **Leverage Azure Blob Lifecycle Management
Azure Blob Storage offers lifecycle management policies to automate the movement of data between different tiers based on predefined rules (e.g., moving blobs from Hot to Cool or Archive after a certain period of inactivity).
Example to set lifecycle rules:
- Navigate to Azure Portal -> Storage account -> Data management -> Lifecycle management.
- Create rules to move or delete old data that’s not frequently accessed.
3. Delete Unused or Orphaned Data
Storage costs accumulate when you have unused or orphaned data (e.g., old logs, backups, or unused snapshots). Regularly review and delete unnecessary data to reduce storage costs.
You can automate this by configuring retention policies or using Azure Purview for better data governance.
4. Optimize Backup Storage
For backup storage, choose the appropriate backup option for your use case:
- Azure Backup provides efficient backup services with compression and incremental backups.
- Azure Blob Storage (Snapshots) for less critical backups.
- Use soft delete for Azure Backup to prevent unnecessary recovery storage charges.
5. Use Azure Files Efficiently
Azure Files can be used for SMB-based file sharing, but consider whether you really need it or if alternatives such as Azure Blob Storage with tiering could work better for your use case.
- Azure File Sync can optimize on-premise file storage by syncing with Azure Files and managing local cache.
6. Monitor and Analyze Storage Usage
Regularly monitor storage usage and identify cost drivers:
- Use Azure Cost Management + Billing to track storage usage and costs.
- Enable Azure Monitor and Storage Analytics to track storage metrics like transaction volume, data read/write frequency, etc.
You can use Azure Advisor to get recommendations on optimizing costs and performance for your storage resources.
7. Use Compression and Deduplication
If your data is compressible (e.g., log files), using compression can help reduce storage space. Similarly, consider using deduplication techniques to store unique data only and eliminate redundant data.
8. Avoid Storing Small Files
Storing a large number of small files increases transaction costs in Azure Blob Storage. If possible:
- Group small files into larger objects (e.g., log aggregation or archiving).
- Use Azure Data Lake Storage for large-scale analytics or datasets with small files.
9. Consider Reserved Capacity
For long-term storage needs, you can purchase reserved capacity for Blob Storage or Azure Files, which gives you a discount for committing to a certain amount of storage for 1-3 years.
az storage account update --name <storage-account-name> --resource-group <resource-group> --sku "Standard_GRS"
10. Use Archive Storage for Compliance Data
For data that is rarely accessed but needs to be retained for compliance (e.g., regulatory archives), Azure Archive Storage is the most cost-effective option.
11. Optimize Data Redundancy Options
Choose the right data redundancy option for your storage needs:
- Locally Redundant Storage (LRS): Suitable for non-critical data, provides basic redundancy within a single region.
- Geo-Redundant Storage (GRS): Provides disaster recovery by replicating data to a secondary region. Use this only for critical data.
- Zone-Redundant Storage (ZRS): Offers high availability within a region by replicating data across availability zones.
If data redundancy isn’t critical, LRS will be the most cost-effective.
12. Optimize Storage for Databases
If you’re using Azure SQL Database or Cosmos DB, ensure you’re using the correct performance tier and scaling based on usage patterns. For Azure SQL, leverage Auto Pause for non-production environments.
Summary of azure cloud cost optimization:
- Choose the correct storage tier (Hot, Cool, Archive).
- Use Lifecycle Management policies to automate data tiering.
- Delete unused data regularly to reduce storage footprint.
- Optimize backup storage using Azure Backup or alternative approaches.
- Monitor storage usage regularly using Azure Cost Management.
- Compress and deduplicate data where possible.
- Avoid storing too many small files; group them when possible.
- Use Reserved Capacity for long-term storage.
- Leverage Archive Storage for infrequently accessed compliance data.
- Choose LRS or ZRS for data redundancy based on needs.
By following these strategies, you can significantly reduce your Azure Storage costs while ensuring data is managed effectively and securely.
Best Practices for Cost Optimization
- Regularly Review Usage: Periodically review your VM workloads and configurations to avoid over-provisioning.
- Use Resource Tags: Tag resources to track and manage costs effectively.
- Leverage Discounts: Take advantage of Reserved Instances, Spot VMs, and hybrid benefits for maximum savings.
- Automate Shutdowns: Schedule auto shutdowns for non-critical VMs during off-hours.
Conclusion
By implementing these strategies, you can significantly reduce your Azure VM costs without compromising performance or reliability. Tools like Azure Advisor, Hybrid Benefits, and Spot VMs provide opportunities to optimize resources and save money. Regular monitoring and adjustments ensure that your cloud environment remains cost-efficient over time.
For more details, visit the Azure Virtual Machines Documentation.
Learn More: How to Create a Virtual Machine in Azure